Introduction
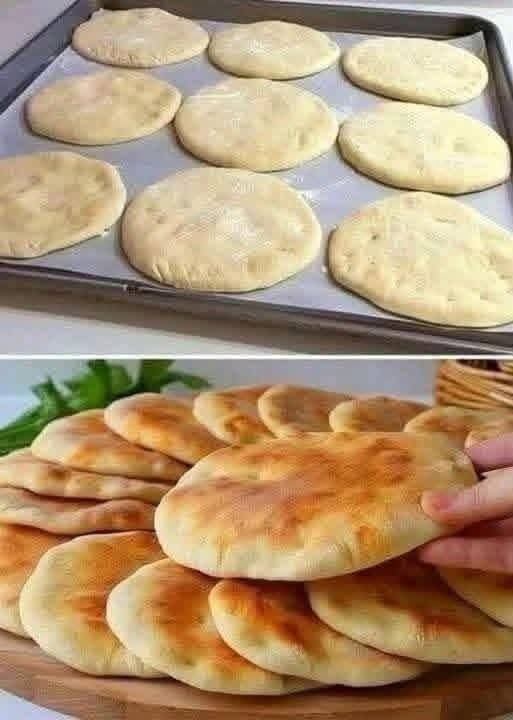
Have you ever wanted to enjoy warm, freshly baked homemade bread without spending money at the bakery every day? This easy no-knead bread recipe is the perfect solution! Made with simple, affordable ingredients, this homemade bread is soft on the inside, beautifully golden on the outside, and delicious enough to serve with almost any meal.
The best part? You don’t need eggs, butter, a stand mixer, or any complicated baking techniques. Simply mix the ingredients, allow the dough to rise, shape it gently, and bake until the bread is golden and fragrant.
Whether you’re preparing breakfast for your family, making sandwiches for lunch, or serving fresh bread alongside dinner, this budget-friendly recipe is a wonderful addition to your kitchen. It’s especially useful for anyone who wants to save money while enjoying the comforting taste of homemade bread.
Save this recipe carefully because it’s simple, economical, and perfect for everyday baking!
Recipe Information
- Preparation time: 10–15 minutes
- Rising time: 60–90 minutes
- Baking time: 25–35 minutes
- Total time: Approximately 1 hour 45 minutes to 2 hours 15 minutes
- Servings: 8–10 slices, depending on loaf size
- Difficulty: Easy
- Cooking method: Oven baking
- Dietary information: Egg-free and butter-free; dairy-free if made with water and no dairy additions
Ingredients
You only need a few inexpensive ingredients to make this delicious homemade bread.
- 3 cups (375 g) all-purpose flour or bread flour
- 1 cup plus 2 tablespoons (approximately 270 ml) warm water
- 2 teaspoons instant yeast (about 7 g)
- 1 tablespoon sugar
- 1 teaspoon salt
- 1 tablespoon vegetable oil (optional, for a slightly softer texture)
Optional ingredients:
- 1 tablespoon sesame seeds for the topping
- A little extra flour for dusting
- A small amount of water for brushing the crust
Note: Flour absorbs water differently depending on the brand and humidity. Keep a little extra flour or water nearby to adjust the dough if needed.
Instructions
Step 1: Prepare the yeast mixture
Pour the warm water into a large mixing bowl. Make sure the water is comfortably warm, not hot. Add the sugar and instant yeast, then stir briefly.
If using active dry yeast, allow the mixture to stand for about 5–10 minutes until it becomes foamy. Instant yeast can generally be mixed directly with the flour.
Step 2: Add the dry ingredients
Add the flour and salt to the bowl. If you want a softer loaf, add the optional tablespoon of vegetable oil.
Mix everything with a wooden spoon until no large patches of dry flour remain. The dough should be sticky and soft rather than firm like traditional kneaded bread dough.
Don’t worry about making it perfectly smooth. This recipe is designed to save time and effort.
Step 3: Let the dough rise
Cover the bowl with a clean kitchen towel or plastic wrap. Leave it in a warm, draft-free place for approximately 60–90 minutes, or until the dough has noticeably increased in size.
The exact rising time depends on the room temperature and the activity of the yeast.
Step 4: Shape the bread gently
Lightly flour your work surface and transfer the dough onto it. Sprinkle a little flour over the top if necessary.
Fold the dough over itself a few times using your hands or a dough scraper. There is no need for traditional kneading.
Shape the dough into a round loaf or an oval loaf. Place it on a baking tray lined with parchment paper.
Step 5: Allow a second rise
Cover the shaped dough loosely and let it rest for another 20–30 minutes. During this time, preheat your oven to 200°C (400°F).
This short resting period helps the bread become lighter and more airy.
Step 6: Prepare the crust
For a simple golden crust, brush or lightly sprinkle the surface with water. If desired, scatter sesame seeds over the top.
You can also make one or two shallow cuts across the surface using a sharp knife. This helps the loaf expand as it bakes.
Step 7: Bake the bread
Place the loaf in the preheated oven and bake for approximately 25–35 minutes, depending on its size and shape.
The bread is ready when the crust is golden brown and the loaf sounds hollow when tapped underneath. If you use a food thermometer, the center should generally reach about 93–96°C (200–205°F).
If the crust browns too quickly, reduce the oven temperature slightly or cover the top loosely with foil near the end of baking.
Step 8: Cool before slicing
Remove the bread from the oven and transfer it to a wire rack. Let it cool for at least 20–30 minutes before slicing.
Although the aroma may make you want to cut into it immediately, cooling allows the inside to finish setting and helps prevent a gummy texture.
Your homemade bread is now ready to enjoy!
Preparation Methods
Method 1: The simple no-knead method
This is the easiest method for beginners. Mix the ingredients, cover the bowl, allow the dough to rise, shape gently, and bake. The yeast develops the dough’s structure during the resting period, so extensive kneading is unnecessary.
Method 2: The soft sandwich-bread method
For a softer loaf, add the optional vegetable oil and bake the dough in a lightly greased loaf pan. Allow it to rise until puffy before baking.
This version is excellent for sandwiches, toast, and school lunches.
Method 3: The rustic crusty-bread method
Shape the dough into a round loaf and bake it on a preheated baking tray. For a crispier crust, place a heatproof pan of hot water on the lower oven rack during the first part of baking, taking care to avoid steam burns.
The result is a rustic loaf with a golden crust and a tender interior.
A Brief History of Homemade Bread
Bread has been an essential food for thousands of years. Early communities discovered that mixing ground grains with water produced a simple dough that could be cooked over hot stones or in primitive ovens.
Over time, breadmaking developed into a wide range of traditions, with different countries creating their own shapes, flavors, textures, and baking methods.
In Morocco, bread holds a special place at the family table. Traditional khobz is commonly served with tagines, soups, vegetables, and many other dishes. Families have long valued homemade bread because it is versatile, filling, and suitable for sharing.
Modern no-knead recipes offer a convenient variation on these traditions. By allowing the dough to rest and rise, home bakers can make satisfying bread without spending a long time kneading it by hand.
This simple recipe combines that convenient approach with affordable everyday ingredients.
Benefits of Making Bread at Home
1. Helps manage your food budget
Flour, yeast, salt, and water are relatively inexpensive ingredients. Making bread at home can help reduce bakery expenses, especially for families who eat bread regularly.
The actual savings depend on local ingredient prices, electricity costs, and the price of the bread you normally buy.
2. Simple ingredients
This basic recipe does not require eggs, butter, milk, or expensive baking mixes. You know exactly what goes into your loaf and can adjust the ingredients to suit your preferences.
3. No intensive kneading
Because the dough is soft and allowed to rise, you don’t need to spend a long time kneading it. This makes the recipe convenient for beginners and people who prefer a simpler baking process.
4. Versatile for everyday meals
Homemade bread can be served at breakfast, lunch, or dinner. Use it for sandwiches, toast, soups, salads, or as an accompaniment to traditional Moroccan dishes.
5. A satisfying homemade experience
Baking bread at home can be a relaxing activity, and the smell of fresh bread can make the kitchen feel warm and welcoming.
6. Easy to customize
You can add sesame seeds, herbs, or a small amount of whole-wheat flour. These changes allow you to experiment with different flavors and textures.
Nutritional note: Bread provides carbohydrates and energy. Its nutritional value depends on the flour and other ingredients used. Whole-grain flour generally provides more fiber than refined white flour.
Tips for Perfect Homemade Bread
- Use warm, not hot, water. Very hot water can damage the yeast.
- Measure the flour carefully. Too much flour can make the loaf dense and dry.
- Keep the dough slightly sticky. A soft dough helps produce a tender interior.
- Give the dough enough time to rise. Look for a noticeable increase in size rather than relying only on the clock.
- Avoid adding too much flour while shaping. Excess flour can make the bread heavy.
- Preheat the oven fully. A properly heated oven encourages good expansion and browning.
- Don’t slice the loaf too soon. Letting it cool helps the crumb set.
- Check your yeast. If it is old or inactive, the dough may not rise properly.
Serving Suggestions
Fresh homemade bread is delicious in many different ways.
For breakfast
Serve warm slices with olive oil, honey, jam, cheese, or olives. You can also toast the bread and pair it with eggs or your favorite breakfast spread.
For lunch
Use the bread to make sandwiches with tuna, chicken, cheese, tomatoes, lettuce, or roasted vegetables.
For dinner
Serve it alongside Moroccan tagine, lentil soup, harira, vegetable stews, or grilled meat. Its soft interior is excellent for soaking up flavorful sauces.
For snacks
Toast a slice and top it with peanut butter, mashed avocado, or a little olive oil and herbs.
For family gatherings
Cut the loaf into thick slices or small pieces and place it in a bread basket. Homemade bread is a simple way to make an ordinary meal feel special.
Storage Instructions
At room temperature: Once completely cool, store the bread in a clean bread bag or airtight container for approximately 2–3 days. Keep it in a cool, dry place.
In the refrigerator: Refrigeration can make bread stale more quickly, so room-temperature storage is usually preferable for short-term use.
In the freezer: Slice the completely cooled loaf, place the slices in a freezer-safe bag, and freeze for up to about 2–3 months for best quality. Remove individual slices as needed and toast or reheat them.
To reheat: Warm slices in a toaster or heat the loaf briefly in an oven. A few drops of water on the crust before reheating can help refresh its texture.
Discard bread if you notice mold or an unusual smell.
Common Questions
Can I make this bread without eggs?
Yes! This recipe contains no eggs.
Can I make it without butter?
Absolutely. Butter is not required. The optional vegetable oil helps soften the bread, but you can leave it out.
Can I make it without kneading?
Yes. Mix the dough thoroughly with a spoon, let it rise, and fold it gently when shaping. The dough’s resting time helps develop its structure.
Can I make this bread without milk?
Yes. Water is the only liquid required in this recipe, so it can be dairy-free as written.
Why did my bread turn out dense?
Common causes include inactive yeast, insufficient rising time, too much flour, or water that was too hot or too cold. Check the yeast and allow the dough enough time to rise.
Can I use whole-wheat flour?
Yes, but whole-wheat flour absorbs more water and can produce a denser loaf. Start by replacing about one-quarter of the white flour with whole-wheat flour, then adjust the water if necessary.
Can I make this bread without sugar?
Yes. Sugar helps yeast begin working more quickly and contributes to browning, but it is not strictly necessary for yeast fermentation. You can omit it, although rising and browning may differ slightly.
Conclusion
This easy no-knead homemade bread proves that delicious baking doesn’t have to be complicated or expensive. With flour, water, yeast, salt, and a little patience, you can make a golden loaf with a soft interior without using eggs or butter.
It’s a wonderful recipe for beginners, busy families, and anyone who wants to prepare more food at home while keeping things simple.
Once you try it, you may find yourself making it regularly for breakfast, sandwiches, and family meals. Experiment with different shapes and toppings to discover your favorite version.