Introduction
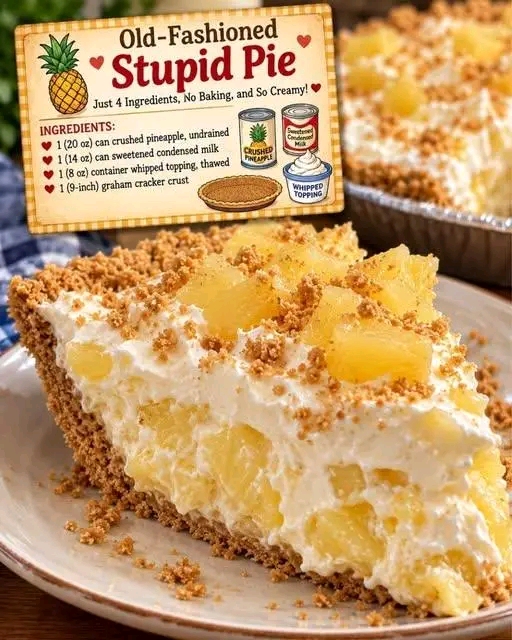
If you love creamy desserts that are easy to prepare and taste like a little piece of homemade nostalgia, this Old-Fashioned Stupid Pie is a recipe you will want to keep close. Made with just four simple ingredients, this delicious no-bake pineapple pie combines a buttery graham cracker crust, sweet crushed pineapple, rich condensed milk, and fluffy whipped topping to create a wonderfully creamy dessert.
Despite its unusual name, this pie is anything but ordinary! It is incredibly simple to make, requires no oven, and is perfect for busy days when you want to prepare something sweet without spending hours in the kitchen. The pineapple adds a bright, fruity flavor that balances the richness of the creamy filling, while the graham cracker crust provides a satisfying crunch.
This pie is ideal for family gatherings, summer picnics, potlucks, holiday dinners, birthday celebrations, or a relaxing weekend treat. You can prepare it ahead of time, let it chill in the refrigerator, and serve it whenever your guests are ready for dessert.
The best part? You do not need advanced baking skills or expensive ingredients. With only four main ingredients and a few easy steps, you can create a beautiful dessert that looks impressive and tastes delicious.
Recipe Information
- Recipe Name: Old-Fashioned Stupid Pie
- Recipe Category: No-Bake Dessert
- Cuisine: American-inspired home cooking
- Preparation Time: 10–15 minutes
- Chilling Time: 4–6 hours, preferably overnight
- Total Time: Approximately 4 hours and 15 minutes
- Cooking Method: No-bake, refrigerator chilling
- Servings: 8 slices
- Difficulty Level: Very easy
- Main Flavor: Sweet pineapple and creamy vanilla
- Texture: Smooth, fluffy, fruity, and slightly crunchy
Ingredients
You will need four simple ingredients to prepare this creamy pineapple pie.
1. Crushed Pineapple – 1 Can (20 Ounces)
Use one 20-ounce can of crushed pineapple, including its juice. The pineapple gives the pie its refreshing tropical flavor and provides little pieces of fruit throughout the filling.
For the best results, choose pineapple packed in juice rather than heavy syrup if you prefer a less intensely sweet dessert.
Important: This recipe uses the pineapple juice to help create the filling. However, excess liquid can prevent the pie from setting properly. If the mixture looks unusually watery, drain off a small amount of juice while keeping the pineapple moist.
2. Sweetened Condensed Milk – 1 Can (14 Ounces)
Sweetened condensed milk creates a rich, smooth, and sweet base for the filling. Its thick consistency helps bring the ingredients together and gives the pie a creamy texture.
Make sure you use sweetened condensed milk rather than evaporated milk. These products are different, and evaporated milk will not provide the same sweetness or consistency.
3. Whipped Topping – 1 Container (8 Ounces)
Use one 8-ounce container of frozen whipped topping, completely thawed according to the package instructions.
The whipped topping makes the filling light, fluffy, and airy. Fold it gently into the pineapple mixture to maintain as much volume as possible.
You may substitute homemade stabilized whipped cream, although the texture and firmness can differ.
4. Graham Cracker Crust – 1 Prepared 9-Inch Crust
A prepared 9-inch graham cracker crust makes this recipe especially convenient. Its buttery, lightly sweet flavor complements the creamy pineapple filling.
You can purchase a ready-made crust or prepare your own with crushed graham crackers and melted butter.
Optional Garnishes
These additions are not necessary for the original four-ingredient recipe, but they can make the finished pie look even more inviting:
- Extra crushed graham crackers
- A few small pineapple pieces
- Fresh mint leaves
- A little toasted coconut
- Additional whipped topping
Instructions
Step 1: Prepare the Crust
Place the prepared 9-inch graham cracker crust on a flat tray or serving plate. Make sure the crust is intact and ready to hold the filling.
If you are making your own crust, combine approximately 1½ cups of finely crushed graham crackers with 5–6 tablespoons of melted butter. Press the mixture firmly into a 9-inch pie plate and refrigerate it for 20–30 minutes before filling.
A chilled crust is less likely to crumble when you add the filling.
Step 2: Prepare the Pineapple
Open the can of crushed pineapple and inspect the amount of liquid.
The original recipe uses undrained pineapple, but canned pineapple can vary in how much juice it contains. Too much liquid may leave the pie soft, so remove a little excess juice if needed.
Keep the pineapple moist and reserve the remaining juice for another use, such as a smoothie.
Step 3: Mix the Pineapple and Condensed Milk
Place the crushed pineapple in a large mixing bowl.
Pour in the sweetened condensed milk and stir gently until the two ingredients are evenly combined.
The mixture should look creamy, pale yellow, and slightly thick. Make sure there are no large pockets of condensed milk remaining at the bottom of the bowl.
Avoid beating the mixture excessively. Gentle mixing is enough to combine the ingredients.
Step 4: Fold in the Whipped Topping
Add the thawed whipped topping to the pineapple mixture.
Using a rubber spatula, gently fold the whipped topping into the mixture. Bring the spatula down through the center of the bowl, sweep along the bottom, and lift the mixture over itself.
Continue until the filling is evenly blended and fluffy.
Do not stir too vigorously, because excessive mixing can reduce the airy texture that makes this pie so pleasant.
Step 5: Fill the Graham Cracker Crust
Spoon the pineapple cream filling into the prepared crust.
Spread it evenly with a spatula, gently smoothing the surface. Make sure the filling reaches the edges of the crust without breaking the sides.
If you want a decorative finish, create soft swirls across the top with the back of a spoon.
For an attractive presentation, sprinkle a small amount of crushed graham crackers over the filling and arrange a few pineapple pieces on top.
Step 6: Cover and Refrigerate
Cover the pie carefully with plastic wrap or a suitable pie cover.
Place it in the refrigerator for at least 4–6 hours. For the best texture, allow it to chill overnight.
During chilling, the filling becomes firmer and easier to slice. The flavors also have time to blend, creating a more balanced pineapple and cream flavor.
Do not rush this step. Cutting the pie too early may cause the filling to spread or slump.
Step 7: Slice and Serve
Once the pie is thoroughly chilled, remove it from the refrigerator.
Use a sharp knife to cut it into eight slices. For cleaner cuts, wipe the knife with a warm, damp cloth between slices.
Serve each piece cold, with additional whipped topping or a light sprinkle of graham cracker crumbs if desired.
Enjoy the combination of creamy filling, sweet pineapple, and buttery crust!
Preparation Methods
Method 1: The Traditional Four-Ingredient Method
This is the simplest approach and stays close to the original recipe.
- Combine the crushed pineapple and condensed milk.
- Fold in the whipped topping.
- Transfer the filling into the prepared graham cracker crust.
- Cover and refrigerate until firm.
- Slice and serve chilled.
This method is perfect for beginners and anyone who wants a quick dessert without baking.
Method 2: The Extra-Firm Chilled Method
If you want slices that hold their shape more reliably, pay special attention to moisture and chilling.
Drain excess pineapple juice if necessary, fold in the whipped topping gently, and refrigerate the finished pie overnight.
A properly chilled filling will generally be easier to cut than one that has only been refrigerated for a short time.
Remember that this four-ingredient filling is naturally soft, so it will not have exactly the same firmness as a baked cheesecake.
Method 3: The Homemade Crust Method
For a more homemade flavor, prepare the crust yourself.
Ingredients for the crust:
- 1½ cups graham cracker crumbs
- 5–6 tablespoons melted butter
- 1–2 tablespoons sugar, optional
Mix the crumbs with the melted butter and optional sugar until the texture resembles damp sand. Press firmly into the bottom and sides of a 9-inch pie plate.
Refrigerate until firm before adding the filling. If you prefer a toasted flavor, you can bake the crust separately at 350°F (175°C) for approximately 8–10 minutes, then let it cool completely before filling.
The pie itself remains a no-bake dessert.
The History of Old-Fashioned No-Bake Pie
No-bake pies have long been popular in American home kitchens because they are easy to prepare, require relatively few ingredients, and can be made ahead of time.
During the twentieth century, convenience foods such as canned fruit, sweetened condensed milk, packaged dessert toppings, and ready-made crusts became increasingly common in household cooking. These ingredients made it possible for home cooks to create desserts without elaborate preparation or specialized equipment.
Pineapple became a popular ingredient in many sweet dishes because its bright flavor worked well with cream, coconut, gelatin, and other dessert ingredients.
Refrigerator pies, icebox cakes, and chilled cream desserts were especially practical in warm weather, when turning on an oven was less appealing. Families could mix a filling, place it in a crust, and let the refrigerator do most of the work.
The exact origin of the name “Stupid Pie” is not firmly established. It is best understood as a playful recipe name that emphasizes just how easy the dessert is to make, rather than as the name of a historically documented classic.
Although recipes vary from household to household, the idea behind this pie remains timeless: combine convenient ingredients, chill until ready, and share something sweet with the people you love.
Benefits of This Recipe
1. Simple Ingredients
This recipe requires only four main ingredients, making it easy to shop for and prepare.
You do not need flour, eggs, a complicated filling, or special baking equipment.
2. No Oven Required
Because the pie sets in the refrigerator, it is particularly convenient during hot weather or when the oven is already being used for another meal.
3. Quick Preparation
The active preparation takes approximately 10–15 minutes. Most of the total time is spent chilling, so you can make the pie in advance and focus on other tasks.
4. Fruity Flavor
Pineapple provides a sweet-tart flavor that helps balance the richness of the condensed milk and whipped topping.
Pineapple also contains vitamin C and other nutrients, although the amount in each serving depends on the ingredients and portion size.
5. Convenient for Gatherings
A single 9-inch pie can be cut into approximately eight servings, making it a practical choice for family dinners, celebrations, and potlucks.
6. Easy to Customize
You can change the garnish, add a little toasted coconut, or use a different compatible crumb crust to create a variation that suits your preferences.
7. Beginner-Friendly
The recipe involves no complicated techniques. Anyone comfortable stirring ingredients and folding whipped topping can make it successfully with a little patience.
Nutritional Information
The following values are estimates only. Actual nutrition depends on the brands used, the amount of pineapple juice retained, the crust, and the serving size.
Approximate nutrition per slice, assuming eight servings:
- Calories: 350–450
- Carbohydrates: 45–60 g
- Total sugars: 30–45 g
- Fat: 14–22 g
- Protein: 4–7 g
These estimates are not laboratory-tested nutrition values.
Is This a Healthy Dessert?
This pie can be enjoyed as an occasional dessert, but it is relatively high in added sugar because of the sweetened condensed milk and sweetened crust.
Pineapple contributes fruit and some vitamin C, but that does not make the entire pie a low-sugar or low-calorie food.
If you want a lighter version, consider using a reduced-sugar crust, choosing a less sweet whipped topping, and serving smaller slices. Keep in mind that changing the ingredients may affect the taste and texture.
Tips for the Perfect Pineapple Pie
Control the Moisture
The most important tip is to avoid adding too much pineapple liquid. A watery filling may struggle to firm up in the refrigerator.
Thaw the Whipped Topping Properly
Follow the package instructions and allow the topping to thaw in the refrigerator. Do not use it while frozen, because it may be difficult to fold evenly into the filling.
Fold, Do Not Beat
Gentle folding helps preserve the air in the whipped topping and gives the pie its light texture.
Chill Long Enough
A minimum of 4–6 hours is recommended, but overnight chilling generally gives better results.
Keep the Pie Cold
This dessert contains dairy ingredients and should be refrigerated. Avoid leaving it at room temperature for extended periods.
Use a Sharp Knife
A clean, sharp knife makes slicing easier and helps preserve the appearance of the creamy filling.
Decorate Just Before Serving
For the freshest presentation, add delicate garnishes shortly before serving. This is especially helpful if you are using fresh mint or extra whipped topping.
Delicious Variations
Pineapple Coconut Cream Pie
Fold a small amount of finely shredded coconut into the filling or sprinkle toasted coconut on top.
The coconut adds a tropical aroma and pairs beautifully with pineapple.
Pineapple Cheesecake-Style Pie
For a richer variation, blend softened cream cheese until smooth before incorporating the condensed milk and pineapple. Fold in the whipped topping last.
This variation uses additional ingredients and may require adjustments to the liquid content and chilling time.
Pineapple Lemon Pie
Add a small amount of finely grated lemon zest to bring a fresh citrus note to the filling.
Avoid adding too much liquid lemon juice, which can alter the texture.
Pineapple and Graham Cracker Crunch Pie
Reserve a few graham cracker crumbs and sprinkle them over the pie just before serving.
The crumbs create a pleasant contrast with the soft filling.
Individual Pineapple Dessert Cups
Instead of using one large crust, divide the crumb mixture and filling among individual dessert cups.
Chill until set and garnish each portion with pineapple pieces. This makes serving easier at parties.
Serving Suggestions
Old-Fashioned Stupid Pie tastes best when served cold, straight from the refrigerator.
Here are some delicious ways to serve it:
- After dinner: Serve a small slice after a family meal.
- At summer gatherings: Pair it with fresh berries or other seasonal fruit.
- For afternoon coffee: Enjoy a slice with coffee, tea, or a glass of cold milk.
- At potlucks: Transport the pie in a covered container kept cold.
- For celebrations: Add whipped topping and a few pineapple pieces for a festive finish.
Because the filling is sweet and creamy, modest portions are often satisfying.
Storage Instructions
Refrigerator Storage
Cover the pie and refrigerate it promptly. For the best flavor and texture, enjoy it within 2–3 days.
Because the filling contains dairy ingredients and fruit, keep it refrigerated at 40°F (4°C) or below.
Freezing Instructions
You can freeze the pie if you want a firmer, semifrozen dessert. Wrap it securely and freeze it for up to about one month for best quality.
Thaw it in the refrigerator before serving, or serve it slightly frozen if you enjoy an ice-cream-like texture. Be aware that whipped topping and fruit may change texture after freezing and thawing.
Can You Make It Ahead?
Yes! This pie is especially convenient to prepare the day before serving. Overnight chilling helps it firm up and gives you one less task to complete on the day of your gathering.
Common Mistakes to Avoid
Adding too much pineapple juice: Excess liquid can make the filling runny. Check the consistency and drain a little liquid if necessary.
Using evaporated milk: Evaporated milk is not a direct substitute for sweetened condensed milk. Use the correct ingredient for the intended sweetness and thickness.
Overmixing the whipped topping: Vigorous stirring can reduce the airy texture. Fold gently.
Cutting too early: The filling needs sufficient time to chill. Give it at least 4–6 hours.
Leaving the pie unrefrigerated: Keep it cold, particularly when serving it outdoors or at a party.
Expecting a baked-pie texture: This is a soft refrigerator pie, not a firm baked custard pie. Its texture should be creamy and light.
Frequently Asked Questions
Why Is It Called Stupid Pie?
The name is playful and refers to how simple the recipe is. The exact historical origin of the name is uncertain.
Can I Use Fresh Pineapple?
Fresh pineapple can be used in some variations, but it should be finely crushed and well-drained. Canned pineapple is more convenient and provides a consistent texture.
Can I Make This Pie Without a Graham Cracker Crust?
Yes. You can spoon the filling into dessert glasses or small bowls and chill it as a crustless pineapple cream dessert.
Why Did My Pie Not Set?
The most common reasons are excess pineapple liquid, insufficient chilling, or a whipped topping that was not properly prepared. Drain excess liquid if needed and refrigerate the pie overnight.
Because this recipe contains no gelatin or other dedicated setting agent, it will remain softer than some other refrigerator pies.
Can I Reduce the Sweetness?
You can experiment with a less-sweet crust and unsweetened homemade whipped cream. However, the condensed milk is a central ingredient, so changing it substantially will affect both sweetness and consistency.
Can I Prepare It the Night Before?
Absolutely. Preparing the pie the night before is one of the best ways to achieve a well-chilled filling that is easier to slice.
Conclusion
Old-Fashioned Stupid Pie proves that a memorable dessert does not need a long ingredient list or hours of baking. With crushed pineapple, sweetened condensed milk, whipped topping, and a graham cracker crust, you can prepare a creamy, fruity pie that is simple enough for everyday treats and delicious enough for special occasions.
Its sweet pineapple flavor, fluffy filling, and buttery crust make every slice feel comforting and familiar. Since the refrigerator does most of the work, this is an excellent recipe to prepare ahead of time when you are hosting family or friends.
Remember the three keys to success: control the excess pineapple liquid, fold the whipped topping gently, and allow plenty of time for chilling.
Make it for your next gathering, serve it cold, and enjoy the smiles that come with a homemade dessert.
For Pineapple Dessert Lovers
If you enjoy creamy, fruity desserts that are easy to prepare, this Old-Fashioned Stupid Pie deserves a place in your recipe collection. It is an inviting choice for pineapple lovers, busy home cooks, beginner bakers, and anyone who appreciates an old-fashioned dessert without complicated preparation.
Save the recipe for later, share it with friends and family, and try it the next time you need a quick no-bake treat. One chilled slice may be all it takes to make this easy pineapple pie a new family favorite!