Introduction
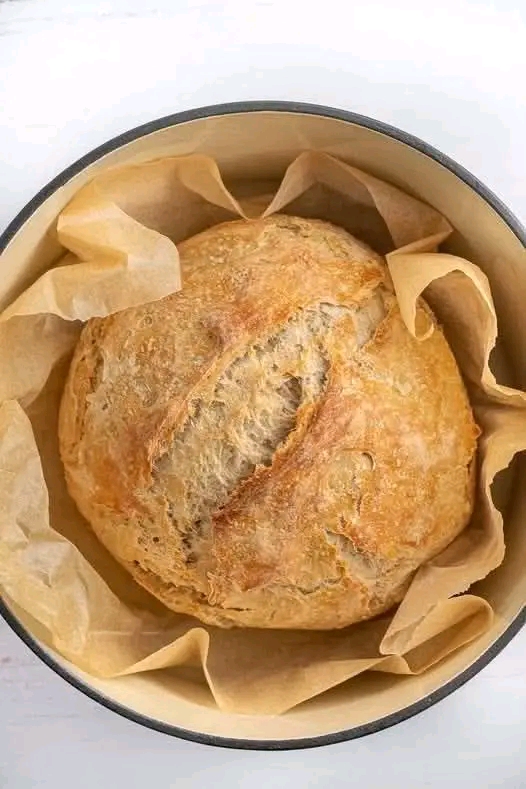
There is nothing quite like the smell of freshly baked homemade bread filling your kitchen. This beautiful Dutch oven bread features a golden, crispy crust, a soft and airy interior, and a rustic appearance that makes every slice feel special. The best part? You only need a few simple ingredients to create a delicious loaf right at home!
This homemade crusty bread is perfect for breakfast, lunch, dinner, or a cozy afternoon snack. Serve it warm with butter, olive oil, cheese, soup, or your favorite homemade spread. Its crunchy exterior and tender center make it a wonderful addition to almost any meal.
Even if you are new to bread baking, this beginner-friendly recipe is worth trying. With a little patience and the right baking method, you can enjoy bakery-style bread straight from your own oven.
Ingredients
For one rustic loaf:
- 3 cups (375 g) all-purpose flour or bread flour
- 1½ teaspoons salt
- ½ teaspoon instant yeast
- 1½ cups (355 ml) lukewarm water
- 1 teaspoon honey or sugar (optional)
- A little extra flour for dusting
- Parchment paper for baking
Optional additions:
- 1 tablespoon olive oil for a slightly softer texture
- 1 teaspoon dried rosemary for a fragrant herb bread
- 1 teaspoon garlic powder for extra flavor
- 2 tablespoons sunflower or sesame seeds for added texture
Instructions
Step 1: Mix the ingredients
In a large mixing bowl, combine the flour, salt, and instant yeast. Add the lukewarm water and optional honey or sugar. Stir everything together with a wooden spoon until a rough, sticky dough forms.
Do not worry if the dough looks shaggy or uneven. This bread does not require traditional kneading, and the long resting time helps develop its structure.
Step 2: Let the dough rest
Cover the bowl with a clean kitchen towel, plastic wrap, or a lid. Leave the dough at room temperature for approximately 8–12 hours, or overnight.
During this time, the dough will rise, develop bubbles, and become softer and more elastic. The exact rising time depends on your room temperature.
Step 3: Shape the dough
Lightly flour a clean work surface and gently transfer the dough onto it. Fold the edges toward the center several times to create a rounded loaf.
Turn the dough over so the smoother side faces upward. Avoid adding too much flour or pressing out all the air bubbles.
Let the shaped dough rest for another 30–45 minutes while covered with a clean towel.
Step 4: Preheat the oven and Dutch oven
Place a Dutch oven with its oven-safe lid inside your oven. Preheat to 230°C (450°F) for approximately 30 minutes.
Important: Make sure your Dutch oven, lid, and handles are rated for this temperature. Never place a cold Dutch oven into a hot oven if its manufacturer advises against it.
Step 5: Prepare the loaf
Carefully remove the hot Dutch oven using oven mitts. Place a sheet of parchment paper under the dough and lower the loaf into the pot.
For a traditional bakery-style appearance, make a shallow slash across the top with a sharp bread lame or suitable blade. This allows the loaf to expand as it bakes.
Step 6: Bake the bread
Cover the Dutch oven with its lid and bake for 30 minutes. The trapped steam helps the loaf expand and develop a beautiful crust.
Remove the lid and bake for another 10–15 minutes, until the bread is deeply golden brown.
If the loaf browns too quickly, reduce the temperature slightly and continue baking until it is cooked through.
Step 7: Cool before slicing
Carefully remove the bread from the pot and place it on a wire rack. Allow it to cool for at least 45–60 minutes before slicing.
Although the aroma may tempt you to cut it immediately, cooling helps the interior finish setting and prevents the bread from becoming gummy.
Methods for Perfect Homemade Bread
1. The no-knead method
This recipe uses a simple no-knead technique. Instead of spending time kneading the dough, you allow it to rest for several hours. During fermentation, the flour absorbs the water and the dough develops structure naturally.
2. The Dutch oven method
A covered Dutch oven traps moisture released by the dough. This creates a steamy environment that helps the loaf rise before its crust becomes firm.
Once the lid is removed, the dry heat encourages browning and creates the crisp exterior shown in the photograph.
3. The overnight fermentation method
A long, slow rise gives the bread time to develop flavor. Using a small amount of yeast helps prevent the dough from rising too quickly.
For a slower fermentation, place the covered dough in the refrigerator and allow extra time for it to come closer to room temperature before shaping.
4. The crispy-crust method
For the best crust, preheat the oven thoroughly, keep the lid on during the first part of baking, and remove it for the final stage. Always cool the finished loaf on a rack rather than leaving it inside the hot pot.
A Brief History of Rustic Bread
Bread has been an important food in many cultures for thousands of years. Early communities made simple flatbreads from ground grains and water, while later baking traditions developed a wide variety of risen loaves.
Traditional European country breads became known for their hearty texture, simple ingredients, and thick crusts. Dutch ovens and other heavy covered pots later became popular tools for home cooks because they retain heat and help create a bread-baking environment similar to that of a professional oven.
Modern no-knead bread recipes brought this traditional style to more home kitchens by showing that excellent bread does not always require complicated techniques or specialized equipment.
Today, rustic homemade bread remains popular because it is economical, versatile, and deeply satisfying to make.
Benefits of Homemade Bread
1. Simple ingredients
Making bread at home allows you to choose the ingredients and avoid unnecessary additives. This recipe uses flour, water, salt, and yeast as its foundation.
2. A budget-friendly choice
A homemade loaf can be economical compared with buying artisan bread regularly, especially when you already have basic baking ingredients in your pantry.
3. Customizable flavor
You can adapt the recipe to your taste by adding herbs, seeds, roasted garlic, or a portion of whole-wheat flour.
4. A source of energy
Bread provides carbohydrates, which the body uses as an important source of energy. Whole-grain flour can provide more fiber and micronutrients than refined flour.
5. A satisfying cooking experience
Preparing bread can be a rewarding kitchen activity. Watching a simple mixture transform into a golden loaf is enjoyable for beginners and experienced cooks alike.
A helpful note: Homemade bread is not automatically healthier than every store-bought loaf. Its nutritional value depends on the flour, ingredients, portion size, and what you serve with it.
Nutrition Information
The following figures are estimates for one loaf made with the main ingredients and divided into 10 slices.
- Calories: approximately 130–150 per slice
- Carbohydrates: approximately 27–30 g per slice
- Protein: approximately 4–5 g per slice
- Fat: approximately 0–2 g per slice
- Fiber: approximately 1 g per slice when made with refined flour
Actual values vary with the flour used, slice size, and optional ingredients. This bread contains gluten and is not suitable for people who need to avoid gluten unless a suitable gluten-free recipe is used.
What to Serve with Crusty Homemade Bread
This loaf is delicious in many different ways.
- For breakfast: Serve toasted slices with butter, jam, honey, or scrambled eggs.
- For lunch: Pair with tomato soup, lentil soup, salad, or a sandwich filling.
- For dinner: Serve alongside roasted chicken, vegetables, stew, or pasta.
- For a snack: Dip slices into olive oil, spread with cream cheese, or top with fresh tomatoes and herbs.
- For entertaining: Cut the loaf into slices and serve on a wooden board with cheese, olives, and spreads.
Storage and Reheating
At room temperature: Keep the fully cooled loaf in a paper bag or bread box for up to 2–3 days for the best texture.
For longer storage: Slice the bread and freeze it in a sealed freezer-safe bag for up to 3 months for best quality.
To reheat: Warm the loaf in a 180°C (350°F) oven for about 8–10 minutes. Toast individual slices when you want a quick, crunchy serving.
Avoid storing crusty bread in the refrigerator, as it can become stale more quickly.
Common Mistakes to Avoid
- Using water that is too hot: Very hot water can damage yeast. Lukewarm water is best.
- Adding too much flour: A slightly sticky dough is normal for no-knead bread.
- Skipping the preheating: A properly heated Dutch oven helps the loaf rise and develop a crust.
- Cutting too early: Let the bread cool so its interior can finish setting.
- Using an unsuitable pot: The Dutch oven and lid must be safe for high oven temperatures.
- Expecting identical rising times: Temperature, yeast activity, and flour type all affect fermentation.
Conclusion
Homemade Dutch oven crusty bread is proof that a few simple ingredients can create something truly special. With its golden exterior, rustic appearance, and soft interior, this loaf is perfect for everyday meals, family gatherings, or a quiet morning at home.
The no-knead method makes the process easier, while the covered-pot baking technique helps produce that beautiful artisan-style crust. Once you master the basic recipe, you can experiment with different herbs, seeds, and flour combinations to create your own signature loaf.
Serve it warm, share it with loved ones, and enjoy the wonderful taste of freshly baked bread made from scratch!