Introduction
Chocolate Butter Cookies are delicate, rich, buttery biscuits with a tender, melt-in-the-mouth texture and a delicious chocolate coating. They combine the classic flavor of butter cookies with the richness of chocolate, making them an excellent treat for afternoon tea, celebrations, holidays, parties, or simply enjoying with a cup of coffee or milk.
The secret to good butter cookies is using quality butter, measuring the flour carefully, and avoiding overmixing the dough. The addition of cornstarch gives the cookies a particularly light and tender texture, while milk powder adds richness and a pleasant creamy flavor.
History of Butter Cookies
Butter cookies have a long history in European baking traditions. They are especially associated with countries such as Denmark, the Netherlands, the United Kingdom, and other parts of Europe.
Traditional butter cookies were made with simple ingredients such as butter, flour, and sugar. Over time, bakers developed many variations by adding eggs, vanilla, spices, nuts, chocolate, and other flavorings.
Danish-style butter cookies became particularly well known around the world because of their delicate texture and rich buttery taste. Chocolate-dipped versions are a modern variation that combines the traditional butter-cookie base with chocolate.
Today, chocolate butter cookies are enjoyed internationally and are commonly prepared for Christmas, birthdays, afternoon tea, gift boxes, and special family occasions.
Ingredients
For the Cookies
- 250 g unsalted butter, softened
- 130 g icing sugar
- ½ teaspoon vanilla extract
- 1 egg, lightly beaten
- 270 g cake flour
- 70 g cornstarch
- ⅛ teaspoon salt
- 20 g milk powder
For the Chocolate Coating
- 225 g chocolate melts
Optional Decorations
You can also use:
- Chopped nuts
- Coconut
- Chocolate sprinkles
- White chocolate drizzle
- Dark chocolate drizzle
- Colored sprinkles
- Crushed biscuits
Equipment
You will need:
- Large mixing bowl
- Electric hand mixer or stand mixer
- Spatula
- Measuring scale
- Sieve
- Piping bag
- Star-shaped piping nozzle
- Baking trays
- Baking paper or silicone baking mats
- Cooling rack
- Heatproof bowl
- Microwave or double boiler
- Fork or dipping tool
Preparation Time and Baking Information
- Preparation: 25–35 minutes
- Chilling: 20–30 minutes, if needed
- Baking: approximately 10–15 minutes
- Cooling: 20–30 minutes
- Chocolate dipping: 15–20 minutes
- Total: approximately 1½ hours
- Oven temperature: 170°C, or 160°C fan-forced
The exact baking time may vary depending on the size and thickness of the cookies.
Method
Step 1: Prepare the Oven
Preheat your oven to 170°C.
Line one or two baking trays with baking paper. This prevents the cookies from sticking and makes them easier to remove after baking.
Step 2: Prepare the Butter
Place the softened unsalted butter in a large mixing bowl.
Beat the butter until it becomes smooth, creamy, and slightly pale.
It is important that the butter is softened but not melted. Melted butter can cause the cookies to spread too much during baking.
Step 3: Add the Icing Sugar
Add the icing sugar gradually to the butter.
Beat the mixture until the butter and sugar become light, smooth, and creamy.
This process incorporates air into the mixture and helps create a delicate cookie texture.
Step 4: Add the Vanilla
Add ½ teaspoon of vanilla extract.
Mix gently until the vanilla is evenly incorporated.
Vanilla enhances the buttery flavor and gives the cookies a pleasant aroma.
Step 5: Add the Egg
Lightly beat the egg in a separate bowl.
Add the beaten egg gradually to the butter mixture while mixing.
Continue mixing until the egg is completely incorporated.
Do not add the egg all at once if the butter mixture looks likely to separate. Adding it gradually helps create a smoother mixture.
Step 6: Prepare the Dry Ingredients
In a separate bowl, sift together:
- 270 g cake flour
- 70 g cornstarch
- ⅛ teaspoon salt
- 20 g milk powder
Sifting removes lumps and distributes the dry ingredients evenly.
Step 7: Combine the Dry and Wet Ingredients
Gradually add the dry ingredients to the butter mixture.
Use a spatula or mix on low speed until the ingredients are just combined.
Do not overmix.
Overmixing can develop too much gluten and make the cookies less tender.
The finished dough should be soft enough to pipe but firm enough to hold its shape.
Step 8: Form the Cookies
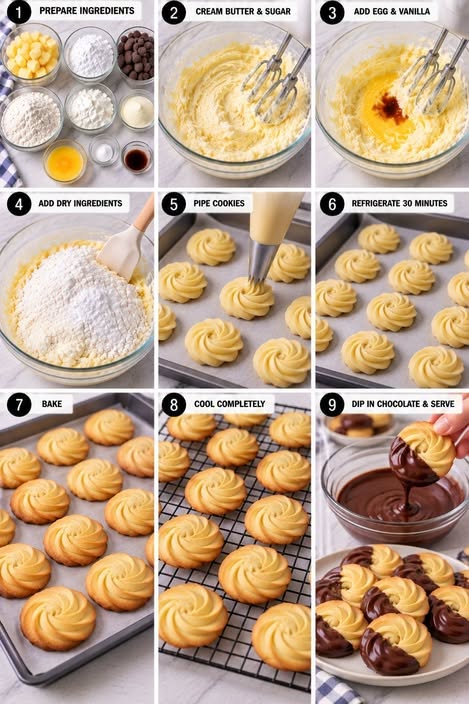
Transfer the cookie dough into a piping bag fitted with a star-shaped nozzle.
Pipe small rosettes, swirls, or other shapes onto the prepared baking tray.
Leave a little space between each cookie because they may spread slightly during baking.
Suggested Shapes
You can make:
- Rosettes
- Small circles
- Stars
- Swirls
- Fingers
- S-shaped cookies
- W-shaped cookies
Try to make the cookies approximately the same size so that they bake evenly.
Step 9: Chill the Cookies
If the dough feels very soft, place the tray in the refrigerator for approximately 20–30 minutes.
Chilling helps the cookies maintain their shape during baking.
This step is particularly useful when making piped butter cookies.
Step 10: Bake
Place the tray in the preheated oven.
Bake for approximately 10–15 minutes, depending on the size of the cookies.
The cookies should remain relatively light in color. The edges may become lightly golden.
Avoid overbaking because butter cookies can become dry if baked for too long.
Step 11: Cool the Cookies
Remove the cookies from the oven and allow them to cool on the baking tray for several minutes.
Then carefully transfer them to a cooling rack.
Allow them to cool completely before dipping them in chocolate.
This is important because warm cookies can cause the chocolate coating to melt or become uneven.
Step 12: Melt the Chocolate
Place the 225 g chocolate melts in a heatproof bowl.
Melt the chocolate using either a microwave or a double boiler.
Microwave Method
Heat the chocolate in short intervals, stirring between each interval.
Continue until the chocolate is smooth and completely melted.
Double-Boiler Method
Place the chocolate in a heatproof bowl over a saucepan containing gently simmering water.
Make sure the bottom of the bowl does not touch the water.
Stir until the chocolate has melted completely.
Avoid allowing water to enter the chocolate because even a small amount can affect its texture.
Step 13: Dip the Cookies
Once the cookies have completely cooled, dip one end or half of each cookie into the melted chocolate.
Allow excess chocolate to drip back into the bowl.
Place the dipped cookies on baking paper.
Step 14: Decorate
While the chocolate is still soft, you can decorate the cookies with:
- Chopped almonds
- Hazelnuts
- Coconut
- Chocolate sprinkles
- Crushed cookies
- White chocolate drizzle
Allow the chocolate to set completely.
For faster setting, the cookies can be placed in the refrigerator for a short period.
Formation and Presentation
The formation of the cookies is an important part of this recipe because the shape contributes to their appearance.
For an elegant presentation, pipe small rosettes with a star nozzle. After baking and cooling, dip approximately one-third to one-half of each cookie into chocolate.
Another attractive option is to dip only the bottom of the cookie in chocolate.
For special occasions, arrange the cookies in small paper cups and place them in a decorative box.
They can also be arranged on a large serving plate with different shapes and chocolate decorations.
Important Baking Tips
Use Soft Butter
The butter should be soft enough to mix easily but should not be melted.
Measure Carefully
For the most consistent results, weigh the ingredients using a kitchen scale.
Don’t Overmix
Once the flour has been added, mix only until the dough comes together.
Keep the Cookies Similar in Size
Cookies of different sizes will bake at different speeds.
Don’t Overbake
Butter cookies should generally remain pale with only lightly golden edges.
Cool Before Dipping
Always allow the cookies to cool completely before adding chocolate.
Use Good-Quality Chocolate
Good-quality chocolate gives the finished cookies a smoother coating and richer flavor.
Benefits of Chocolate Butter Cookies
Chocolate butter cookies are primarily a treat or dessert, rather than a health food. However, their ingredients can contribute certain nutritional qualities.
Butter
Butter provides fat and contributes to the rich flavor and tender texture of the cookies.
Milk Powder
Milk powder contributes protein and minerals such as calcium while also adding a creamy flavor.
Egg
Egg provides protein and helps bind the ingredients together.
Cornstarch
Cornstarch helps create the characteristic delicate and tender texture of the cookies.
Chocolate
Chocolate contributes flavor and, particularly when using dark chocolate, can provide cocoa-derived compounds such as flavonoids.
Because these cookies contain butter, sugar, flour, and chocolate, they are best enjoyed in moderation as part of a balanced diet.
Why People Love Chocolate Butter Cookies
Chocolate butter cookies are loved by many people because they combine several appealing qualities:
- Rich buttery flavor
- Soft, delicate texture
- Pleasant vanilla aroma
- Creamy chocolate coating
- Beautiful decorative shapes
- Easy serving and sharing
- Suitable for celebrations
- Excellent with tea or coffee
They are especially popular with people who enjoy the combination of butter and chocolate.
Serving Suggestions
Chocolate butter cookies can be served with:
- Tea
- Coffee
- Hot chocolate
- Milk
- Cappuccino
- Ice cream
- Fresh fruit
They are also excellent as part of a dessert platter.
For a special occasion, serve them alongside other cookies in different shapes and flavors.
Storage
Allow the chocolate to set completely before storing the cookies.
Place the cookies in an airtight container.
Store them in a cool, dry place away from direct sunlight and heat.
If stored properly, they can remain enjoyable for several days.
Place baking paper between layers if the cookies are decorated with chocolate to help prevent them from sticking together.
Variations
Dark Chocolate Butter Cookies
Dip the cookies in dark chocolate for a deeper, less sweet chocolate flavor.
White Chocolate Butter Cookies
Use white chocolate for a sweeter and more decorative finish.
Nut Chocolate Butter Cookies
Sprinkle chopped almonds, hazelnuts, or pistachios over the melted chocolate.
Coconut Chocolate Butter Cookies
Add a little coconut to the chocolate coating for a tropical variation.
Double Chocolate Cookies
Add a small amount of cocoa powder to the cookie dough and finish with a chocolate dip.
Common Problems and Solutions
The dough is too hard to pipe
The butter may be too cold, or there may be too much flour.
Allow the dough to soften slightly at room temperature before piping.
The cookies spread too much
The butter may have been too warm, or the dough may need chilling.
Chill the piped cookies before baking.
The cookies are too hard
They may have been overbaked or the dough may have been overmixed.
Bake only until the edges are lightly golden.
The chocolate is too thick
The chocolate may not be fully melted. Stir it gently until smooth.
The chocolate does not set properly
The cookies or surrounding environment may be too warm. Allow the chocolate to cool and set in a cool, dry place.
Professional Method Summary
For a professional result, follow this sequence:
Cream → Add sugar → Add vanilla → Add egg → Sift dry ingredients → Combine → Pipe → Chill → Bake → Cool → Dip in chocolate → Decorate → Set → Serve.
This sequence helps maintain the texture, shape, and appearance of the finished cookies.
Conclusion
Chocolate Butter Cookies are a classic and elegant homemade treat that combines the richness of butter with the sweetness of chocolate. The use of cake flour and cornstarch creates a delicate texture, while milk powder adds extra richness and flavor.
The recipe is versatile and can be adapted with different shapes, chocolates, nuts, coconut, or decorative toppings. With careful measuring, gentle mixing, proper piping, and controlled baking, you can produce beautiful cookies suitable for family gatherings, afternoon tea, celebrations, gifts, and special occasions.
Most importantly, chocolate butter cookies are made for sharing and enjoyment. Their buttery texture, delicate shape, and chocolate coating make them a favorite for cookie lovers of all ages.
Whether you prepare them for your family, friends, guests, or simply for yourself, these cookies are a delicious example of how a few simple ingredients can be transformed into an elegant homemade dessert.