Soft, Fluffy, Buttery & Perfect for Sharing
Introduction
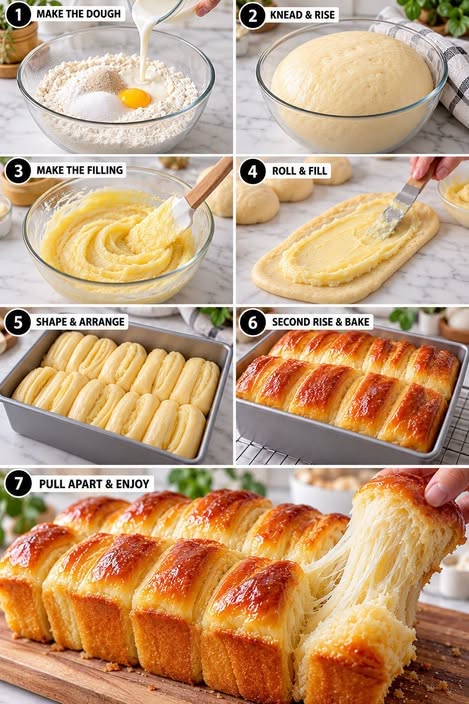
Pull-Apart Bread is one of those homemade breads that looks impressive but is surprisingly simple to prepare. It is made from a soft, enriched yeast dough that is divided into small portions, filled with a delicious buttery mixture, arranged closely together, and baked until beautifully golden.
The best part is how it is served: instead of slicing the bread, everyone can simply pull off a warm, fluffy piece. The inside stays tender and soft, while the outside becomes lightly golden and buttery.
This recipe is wonderful for breakfast, brunch, afternoon tea, family gatherings, holidays, or as a delicious side dish for soups and savory meals.
🧾 Ingredients
For the Dough
- 250 g all-purpose flour or bread flour
- 40 g granulated sugar
- 1 tsp instant yeast (3–4 g)
- 15 g milk powder
- 1 large egg
- 120 ml warm milk
- 30 g softened butter
- ½ tsp salt
For the Filling
- 60 g softened butter
- 2 tbsp brown sugar or granulated sugar
- 1 tsp ground cinnamon
- 50 g chopped nuts, optional
- 40–50 g raisins or chocolate chips, optional
For the Optional Garlic-Herb Butter
- 50 g melted butter
- 2 cloves garlic, finely minced
- 1 tbsp chopped fresh parsley or dried mixed herbs
- ½ tsp salt
- ¼ tsp black pepper
For Finishing
- 1 egg yolk + 1 tbsp milk, optional, for brushing
- A little sesame or poppy seeds, optional
- Extra melted butter for brushing after baking
⏱️ Recipe Information
Preparation time: 25–30 minutes
First rise: 1–1½ hours
Shaping: 15–20 minutes
Second rise: 30–45 minutes
Baking time: 20–25 minutes
Total time: Approximately 2½–3 hours
Yield: 12–16 pull-apart pieces
Oven temperature: 180°C / 350°F
👩🍳 Instructions
Step 1: Prepare the Dough
Place the flour, sugar, instant yeast, milk powder, and salt in a large mixing bowl. Stir everything together.
Add the warm milk and egg. Mix until a rough dough begins to form.
Add the softened butter gradually and begin kneading. Knead by hand for approximately 8–10 minutes, or use a stand mixer with a dough hook for about 6–8 minutes.
The dough should become smooth, soft, and elastic. It may feel slightly sticky at first, but avoid adding too much extra flour because this can make the finished bread heavy.
Step 2: First Rise
Shape the dough into a ball and place it in a lightly greased bowl.
Cover with plastic wrap or a clean kitchen towel.
Place the bowl somewhere warm and allow the dough to rise for approximately 1–1½ hours, or until it has doubled in size.
The rising time will depend on the temperature of your kitchen.
🧈 Step 3: Prepare the Filling
While the dough rises, prepare the filling.
Mix the softened butter, brown sugar, and cinnamon in a small bowl until smooth and creamy.
If desired, add chopped walnuts, pecans, almonds, raisins, or chocolate chips.
For a savory version, skip the sugar and cinnamon and prepare garlic-herb butter instead.
🔪 Step 4: Divide the Dough
Once the dough has doubled in size, gently press it down to remove excess air.
Transfer it to a lightly floured work surface.
Divide the dough into approximately 12–16 equal pieces.
Roll each portion into a smooth little ball.
🥐 Step 5: Fill the Dough
Flatten one dough ball gently with your fingers.
Place a small amount of the filling in the center.
Bring the edges together and pinch them closed.
Roll gently between your hands to create a smooth ball.
Repeat with all the remaining pieces.
🍞 Step 6: Arrange the Bread
Grease a round cake pan, loaf pan, or baking dish.
Place the filled dough balls close together in the pan.
Do not pack them too tightly because they need room to expand during the second rise.
For an attractive presentation, arrange them in a circular pattern or rows.
🌡️ Step 7: Second Rise
Cover the pan loosely with a clean towel.
Let the shaped bread rise for approximately 30–45 minutes.
The dough balls should become visibly puffy and begin touching each other.
This second rise is important because it helps create a soft and fluffy texture.
🥚 Step 8: Brush the Bread
For a beautiful golden finish, whisk together one egg yolk and one tablespoon of milk.
Brush the tops gently with the egg wash.
You can also sprinkle sesame seeds, poppy seeds, or a few chopped herbs over the surface.
🔥 Step 9: Bake
Preheat the oven to 180°C / 350°F.
Place the bread in the center of the oven.
Bake for approximately 20–25 minutes, or until the top is golden brown and the bread is fully baked.
If the top becomes brown too quickly, loosely cover it with aluminum foil during the final part of baking.
🧄 Step 10: Add Garlic-Herb Butter
For an irresistible savory finish, combine melted butter, minced garlic, parsley, salt, and black pepper.
Brush the mixture generously over the hot bread immediately after removing it from the oven.
The butter will soak into the warm bread, creating an incredible aroma and flavor.
❄️ Step 11: Cool Slightly
Allow the bread to rest for approximately 10 minutes.
Do not let it cool completely before serving if you want the best soft, warm texture.
Place the bread in the center of the table and let everyone pull off their own piece.
🍴 Preparation Methods
1. Kneading Method
Kneading develops gluten in the dough, which gives the bread its elasticity and soft structure.
The dough should become smooth and flexible rather than stiff.
2. Filling Method
A thin layer of buttery filling is placed inside each dough portion.
This creates little pockets of flavor throughout the bread.
3. Shaping Method
Each filled dough portion is rolled into a small ball and arranged closely in the baking pan.
As the pieces rise and bake, they join together while remaining easy to pull apart.
4. Proofing Method
The dough requires two rises.
The first rise develops flavor and volume, while the second rise gives the shaped bread its light and fluffy texture.
5. Baking Method
Baking at 180°C allows the bread to develop a golden exterior while keeping the center soft and tender.
6. Finishing Method
Brushing the hot bread with melted butter or garlic-herb butter adds moisture, shine, aroma, and extra flavor.
📜 History
Pull-apart breads belong to a broad family of shared breads found in many baking traditions.
The idea of preparing bread in small connected portions has appeared in different forms around the world. Instead of cutting a large loaf with a knife, diners can tear away individual pieces, making the bread particularly suitable for family meals and gatherings.
Modern pull-apart bread has become especially popular because it combines the comfort of homemade yeast bread with an attractive presentation.
Sweet versions may contain cinnamon, sugar, nuts, fruit, chocolate, or caramel, while savory versions can feature garlic, cheese, herbs, butter, or other flavorful fillings.
Today, pull-apart bread is enjoyed as both a breakfast treat and a side dish.
🌿 Benefits
Although this is a rich homemade bread and should be enjoyed as part of a balanced diet, several ingredients provide useful nutrients.
Flour
Flour provides carbohydrates, which are an important source of energy.
Egg
Egg contributes protein and helps give the bread a rich texture.
Milk
Milk contributes protein and calcium while helping create a tender crumb.
Butter
Butter provides fat that gives the bread its rich flavor and soft texture.
Nuts
If you add walnuts, almonds, or pecans, they can provide healthy fats, protein, and minerals.
Homemade Advantage
Making bread at home gives you control over the ingredients. You can adjust the sugar, choose whole-grain flour, add nuts or seeds, and control the amount of butter used.
🧩 Formation of the Bread
The beautiful structure of pull-apart bread comes from its unique formation.
First, a soft yeast dough is prepared and allowed to rise.
The dough is then divided into several small pieces. Each piece is flattened, filled, sealed, and shaped into a ball.
These balls are placed close together in a baking dish. During the second rise, they expand and begin touching one another.
As they bake, the individual pieces become connected while maintaining their individual shapes.
The result is a golden loaf made from many soft sections that can easily be pulled apart by hand.
💡 Important Tips for Perfect Pull-Apart Bread
- Use warm, not hot, milk.
- Avoid adding too much flour during kneading.
- Give the dough enough time to rise.
- Make sure the butter is softened for easy spreading.
- Seal filled dough balls carefully so the filling does not escape.
- Do not overcrowd the pan before the second rise.
- Let the bread rise until noticeably puffy.
- Avoid overbaking, which can make the bread dry.
- Brush with butter while still warm for a softer crust.
- Let the bread rest for about 10 minutes before pulling it apart.
🍓 Variations
Cinnamon Sugar Pull-Apart Bread
Use butter, cinnamon, and brown sugar for a classic sweet version.
Chocolate Pull-Apart Bread
Add chocolate chips or small pieces of chocolate to the filling.
Nutty Pull-Apart Bread
Mix chopped walnuts, pecans, or almonds into the butter filling.
Garlic Herb Pull-Apart Bread
Replace the sweet filling with garlic, butter, parsley, and herbs.
Cheese Pull-Apart Bread
Add shredded mozzarella, cheddar, or another melting cheese for a savory version.
Cinnamon Raisin Pull-Apart Bread
Add raisins to the cinnamon-butter filling for a fruity variation.
☕ Serving Suggestions
Serve this bread warm with:
- Butter
- Honey
- Jam
- Chocolate spread
- Cream cheese
- Fresh berries
- Coffee
- Tea
- Hot chocolate
For a savory meal, serve garlic-herb pull-apart bread alongside:
- Creamy soup
- Tomato soup
- Pasta
- Roasted chicken
- Grilled meat
- Salads
🧊 Storage
Store leftover bread in an airtight container at room temperature for up to 2 days.
For longer storage, wrap it tightly and refrigerate for up to 4–5 days.
To restore its softness, warm individual pieces in the microwave for a few seconds or reheat the bread gently in the oven.
The baked bread can also be frozen. Wrap it carefully and freeze for up to approximately 2 months.
❤️ For Bread Lovers
If you love soft homemade bread, this recipe is made for you.
Every piece is tender, buttery, fluffy, and full of flavor. The best part is watching everyone gather around the table and pull off their own warm piece.
Whether you prepare it sweet with cinnamon and sugar or savory with garlic and herbs, this bread is guaranteed to be a comforting addition to your table.
📝 Conclusion
Pull-Apart Bread is more than just a homemade loaf—it is a fun and delicious way to bring people together.
Its soft dough, flavorful filling, golden crust, and beautiful pull-apart design make it perfect for breakfast, brunch, celebrations, family dinners, and cozy afternoons.
Once you master the basic dough, you can experiment with countless fillings and flavors.
Make it sweet, make it savory, add chocolate, cinnamon, cheese, garlic, herbs, or nuts—the possibilities are almost endless.
The final result is a warm, homemade bread that looks beautiful, smells incredible, and tastes even better.