Introduction
There is something wonderfully comforting about a loaf of fresh homemade bread. Soft, fluffy, lightly golden on the outside, and tender inside, this classic sandwich-style bread is simple enough for beginners while still producing bakery-quality results.
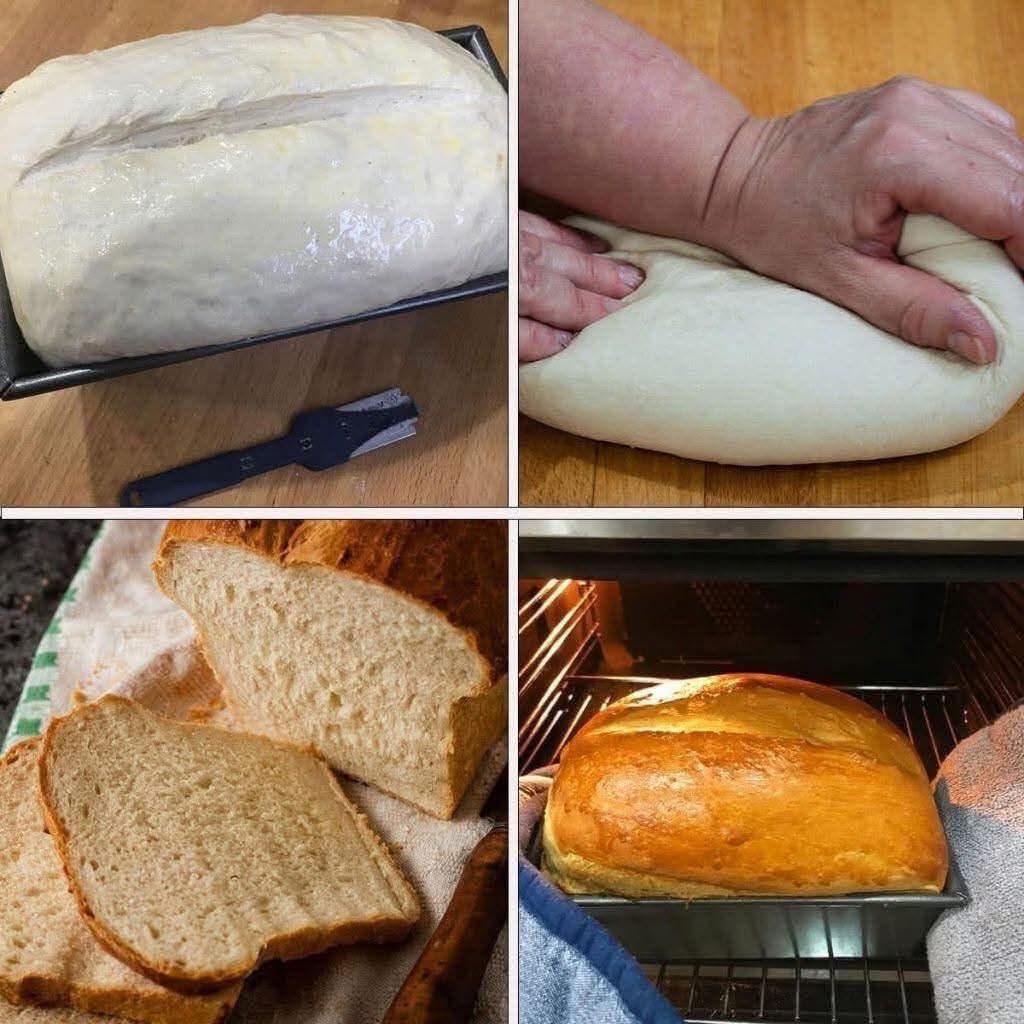
The recipe in the photo follows a traditional approach: prepare a soft yeast dough, knead it until smooth and elastic, allow it to rise, shape it into a loaf, and bake until beautifully golden.
It is perfect for breakfast, sandwiches, toast, French toast, or simply spreading with butter and jam.
🥣 Recipe Information
- Recipe: Homemade Soft White Bread
- Preparation: 20–25 minutes
- First rise: 1–1½ hours
- Second rise: 30–45 minutes
- Baking: 30–35 minutes
- Total time: About 2½–3 hours
- Yield: 1 large loaf
- Difficulty: Easy to moderate
🧈 Ingredients
For the bread dough
- 500 g all-purpose flour or bread flour
- 7 g active dry yeast
- 300 ml warm milk or warm water
- 2 tablespoons sugar
- 1 teaspoon salt
- 2 tablespoons softened butter or vegetable oil
- 1 large egg, optional, for a richer loaf
For the top
- 1 tablespoon milk, optional
- 1 tablespoon melted butter, optional
Tip: The liquid should be warm, not hot. Very hot liquid can damage the yeast.
👩🍳 Instructions
1. Activate the yeast
Place the warm milk or water in a large bowl. Add the sugar and yeast.
Stir gently and leave for 5–10 minutes. If the mixture becomes slightly foamy, the yeast is active.
If using instant yeast, you can mix it directly with the flour instead.
2. Make the dough
Add the flour gradually, followed by the salt and softened butter.
If using an egg, add it at this stage.
Mix everything together until a rough dough forms.
The dough should be soft and slightly tacky, but it should not be extremely wet.
3. Knead the dough
Transfer the dough to a lightly floured work surface.
Knead for approximately 8–12 minutes by hand.
Push the dough forward with the heel of your hand, fold it back, turn it, and repeat.
Continue until the dough becomes:
- Smooth
- Elastic
- Soft
- Less sticky
- Able to stretch without immediately tearing
This kneading stage is important because it develops gluten, which helps give the bread its structure and fluffy texture.
🌾 First Rise
Place the dough in a lightly oiled bowl.
Cover it with plastic wrap, a clean towel, or a lid.
Leave it somewhere warm for approximately 1 to 1½ hours, or until it has roughly doubled in size.
The exact time depends on the temperature of your kitchen.
✋ Formation and Shaping
Once the dough has doubled, gently press it down to release excess gas.
Place it on the work surface and shape it into a rectangle.
Roll the dough tightly from one end to the other, creating a smooth loaf.
Pinch the seam closed and place the loaf seam-side down in a greased loaf pan.
Gently press and shape the dough so that it fits the pan evenly.
⏳ Second Rise
Cover the loaf again and allow it to rise for approximately 30–45 minutes.
It should become visibly puffy and rise close to the top of the pan.
Don’t let it overproof, because an excessively risen loaf can collapse during baking.
🔥 Baking Method
Preheat the oven to 180°C (350°F).
For a shiny golden crust, lightly brush the top with milk.
Place the loaf in the center of the preheated oven.
Bake for approximately 30–35 minutes, or until:
- The top is golden brown.
- The loaf sounds hollow when gently tapped.
- The bread is fully baked inside.
If the top becomes dark too quickly, loosely cover it with aluminum foil during the final part of baking.
🧈 Final Method: Soft Crust
Remove the bread from the oven and immediately brush the top with a little melted butter.
Allow it to cool in the pan for about 10 minutes.
Then transfer it to a wire rack and let it cool completely before slicing.
For the softest texture, avoid cutting the bread while it is still very hot.
📜 History of Homemade Bread
Bread is one of the oldest prepared foods in human history. Ancient civilizations discovered that mixing grains with water and baking the mixture could create a nourishing and portable food.
The development of yeast fermentation eventually transformed bread-making. Instead of producing a dense flat loaf, fermentation allowed dough to expand and become lighter and more airy.
Over generations, homemade bread became an important part of everyday cooking in many cultures. Simple loaves made from flour, water, yeast, and salt evolved into countless regional varieties.
This soft white loaf belongs to the modern family of sandwich and household breads, valued for its tender crumb and versatility.
🌾 Benefits of Homemade Bread
Homemade bread can offer several practical advantages.
1. You control the ingredients
Making bread yourself allows you to choose the flour, amount of salt, sugar, fat, and other ingredients.
2. Freshness
Freshly baked bread has a wonderful aroma and texture that can be difficult to reproduce with packaged bread.
3. Versatility
One loaf can be used for:
- Breakfast toast
- Sandwiches
- Grilled cheese
- French toast
- Bread crumbs
- Croutons
4. Satisfying baking experience
Kneading, shaping, watching the dough rise, and finally seeing the golden loaf emerge from the oven makes homemade bread especially rewarding.
Nutrition note: Bread is primarily a source of carbohydrates. Its nutritional value depends on the flour and other ingredients used. Whole-grain flour can provide more fiber than refined white flour.
❤️ Tips for Perfect Bread
Use the correct temperature
Water or milk that is too hot can interfere with yeast activity.
Don’t add too much flour
A slightly soft dough generally produces a softer loaf. Adding excessive flour can make the bread dense and dry.
Knead properly
Good kneading helps develop gluten and gives the loaf strength.
Give the dough enough time
The dough needs time to ferment and rise. A warm environment helps, but avoid excessive heat.
Don’t overproof
If the dough rises too much, it may lose strength and collapse during baking.
Let the loaf cool
Cooling allows the crumb to finish setting and makes slicing much easier.
🍞 Serving Suggestions
This bread is delicious served warm with:
- Butter
- Honey
- Strawberry jam
- Peanut butter
- Cheese
- Eggs
- Avocado
- Soup
- Chicken or tuna salad
For a simple breakfast, toast two slices and serve them with butter and homemade jam.
🧊 Storage
Once completely cooled, keep the bread in an airtight container or bread bag at room temperature for approximately 2–3 days.
For longer storage, slice the loaf and freeze the slices in a sealed freezer bag.
Frozen slices can be placed directly into a toaster when needed.
💕 Why Bread Lovers Will Love This Recipe
Bread lovers will appreciate this recipe because it produces a loaf that is:
Soft + fluffy + lightly golden + buttery + homemade + versatile.
The dough is straightforward, the ingredients are simple, and the finished loaf can become part of almost any meal.
🍞 Conclusion
Making homemade bread doesn’t have to be complicated. With a few basic ingredients, proper kneading, enough rising time, and careful baking, you can create a beautiful loaf with a golden crust and soft, tender interior.
The most important ingredients aren’t expensive or unusual—they are patience, good technique, and fresh ingredients.
Once you master this basic loaf, you can experiment with whole-wheat flour, herbs, seeds, garlic, cheese, or even sweet variations.