No Added Sugar • No Wheat Flour • Soft, Rich & Chocolatey
Introduction
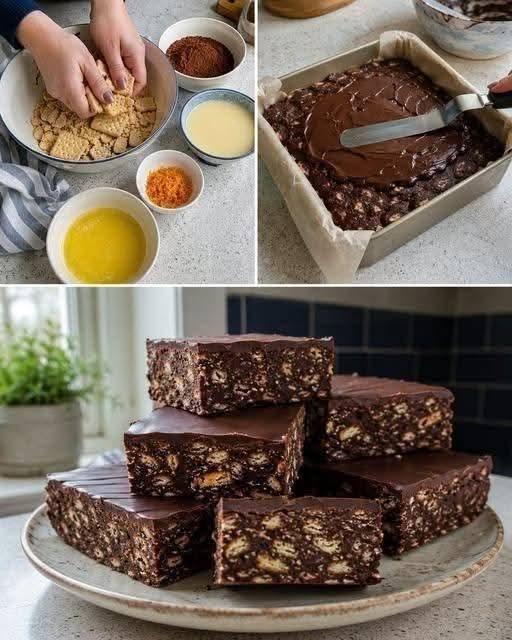
These No-Bake Low-Carb Chocolate Protein Bars are inspired by the delicious chocolate biscuit-style dessert shown in the photo. They have a rich chocolate flavor, a soft and slightly fudgy texture, and a smooth chocolate topping that makes them look incredibly indulgent.
The recipe is designed without wheat flour and added table sugar, making it a better option for people who are looking for a lower-carbohydrate treat. However, the exact carbohydrate and protein content depends on the ingredients you choose, so always check the nutrition labels—especially if you are following a strict keto or bariatric diet.
The best part? No oven is required! Simply mix, press into a pan, chill, add the chocolate topping, and slice.
📝 Recipe Information
- Recipe: No-Bake Chocolate Protein Bars
- Preparation: 15 minutes
- Chilling: 1–2 hours
- Cooking: No baking required
- Yield: 9–12 bars
- Difficulty: Easy
- Style: No-bake / low-carb-inspired dessert
🥣 Ingredients
For the Chocolate Base
- 1 cup finely crushed sugar-free low-carb cookies or crackers
- ½ cup unsweetened cocoa powder
- ½ cup vanilla or chocolate protein powder
- ⅓ cup natural peanut butter or almond butter
- ¼ cup unsweetened milk of your choice
- 2 tablespoons melted butter or coconut oil
- 1 teaspoon vanilla extract
- Pinch of salt
- Low-carb sweetener, to taste, if needed
For the Chocolate Topping
- 100 g sugar-free dark chocolate
- 1 tablespoon coconut oil or butter
- 1–2 tablespoons unsweetened milk, if needed for a softer topping
Optional Additions
- 2 tablespoons chopped walnuts or pecans
- 1 tablespoon unsweetened shredded coconut
- A few drops of almond extract
- Sugar-free chocolate chips
- Chopped roasted hazelnuts
👩🍳 Instructions
Step 1: Prepare the Pan
Line an 8-inch square baking pan with parchment paper, leaving some paper hanging over the sides. This will make it much easier to remove the finished bars.
Step 2: Crush the Cookies
Place the low-carb cookies or crackers into a food processor and pulse until finely crushed.
You want a mixture that resembles fine crumbs, with a few tiny pieces remaining for texture.
Step 3: Mix the Dry Ingredients
In a large bowl, combine:
- Crushed cookies
- Cocoa powder
- Protein powder
- Salt
Stir everything together until evenly combined.
Step 4: Add the Wet Ingredients
Add the peanut butter, melted butter, vanilla extract, and milk.
Mix thoroughly until the mixture becomes thick and sticky.
If it seems too dry, add another teaspoon or two of milk. If it is too wet, add a little more crushed cookie crumbs or protein powder.
Step 5: Press Into the Pan
Transfer the mixture to the prepared pan.
Use the back of a spoon, spatula, or the bottom of a glass to press it down firmly into an even layer.
Pressing firmly is important because it helps the bars hold their shape when sliced.
🍫 Prepare the Chocolate Topping
Melt the sugar-free chocolate together with the coconut oil or butter.
You can melt it gently in the microwave in short intervals, stirring between each interval, or use a double boiler.
Once smooth and glossy, pour the chocolate over the chilled base.
Spread it evenly with a spatula.
For the appearance shown in the photo, leave a few natural swirls across the chocolate surface.
❄️ Chilling Method
Place the pan in the refrigerator for approximately 1–2 hours, or until the chocolate topping is firm and the base feels set.
For firmer bars, place them in the freezer for about 20–30 minutes before slicing.
Don’t freeze them for too long, because the texture can become excessively hard.
🔪 Cutting the Bars
Lift the chilled dessert from the pan using the parchment paper.
Place it on a cutting board and use a sharp knife to cut it into squares or rectangles.
For cleaner cuts, warm the knife under hot water, wipe it dry, and then slice.
Repeat between cuts.
✨ Formation & Texture
The finished bars should have:
- A firm but soft chocolate base
- Small crunchy pieces throughout
- A rich cocoa flavor
- A smooth chocolate topping
- A slightly chewy, fudgy texture
- A beautiful homemade appearance similar to the dessert in the photo
For an extra attractive presentation, sprinkle a few finely chopped nuts over the chocolate before it sets.
📜 A Little History
No-bake chocolate biscuit desserts have become popular in many countries because they offer an easy way to create a rich chocolate treat without using an oven.
Traditional versions often combine crushed biscuits with butter, cocoa, sugar, and chocolate. Modern versions have adapted the idea with ingredients such as protein powder, nut butter, sugar-free chocolate, and lower-carbohydrate alternatives.
This recipe follows that same basic idea while creating a more modern protein-focused, no-bake chocolate bar.
💪 Benefits
These bars can be useful when you want a sweet snack while keeping added sugar low.
🥜 Protein
Protein powder and nut butter can contribute protein, which helps make the dessert more satisfying than a conventional chocolate bar.
🍫 No Added Table Sugar
The recipe doesn’t require ordinary granulated sugar. If you use sugar-free chocolate and cookies, check the labels for the sweeteners and carbohydrate content.
🌾 No Wheat Flour
There is no traditional wheat flour in the recipe.
⚡ No Oven
Everything is prepared without baking, making this a convenient dessert for warm days or quick preparation.
🥜 Healthy Fats
Nut butter can provide fats and some protein, although it is also calorie-dense, so portion size still matters.
Important: “Low-carb,” “keto,” and “high-protein” depend on the exact products used. This recipe is not automatically keto or appropriate for every bariatric diet.
👩🍳 Chef’s Tips
1. Don’t make the mixture too wet
Add the milk gradually. You want a thick mixture that can be pressed firmly into the pan.
2. Use good cocoa
Unsweetened cocoa powder gives the bars a deeper chocolate flavor.
3. Chill before cutting
Cutting too early can cause the bars to crumble.
4. Choose your sweetener carefully
Sugar-free products can contain different sweeteners and carbohydrate amounts. Read the nutrition label if you’re tracking carbs.
5. Add nuts for crunch
Pecans, walnuts, or hazelnuts make these bars especially delicious.
🍽️ Serving Suggestions
Serve the bars:
- With coffee ☕
- With unsweetened tea
- As an afternoon snack
- As a small dessert after dinner
- Chilled straight from the refrigerator
- With a spoonful of unsweetened Greek yogurt
For a beautiful presentation, arrange several squares on a white plate and sprinkle a few chopped nuts around them.
❤️ Why You’ll Love This Recipe
You’ll love these chocolate bars because they are:
✔️ No-bake
✔️ Easy to prepare
✔️ Rich and chocolatey
✔️ Made without wheat flour
✔️ Made without added table sugar
✔️ Protein-focused
✔️ Customizable
✔️ Great for chocolate lovers
✔️ Perfect for make-ahead snacking
🧊 Storage
Store the finished bars in an airtight container in the refrigerator for up to 5 days, depending on the freshness of the ingredients used.
They can also be frozen. Separate individual pieces with parchment paper before freezing so they don’t stick together.
Allow frozen bars to soften in the refrigerator before serving.
🍫 Final Result
After chilling, you’ll have delicious No-Bake Chocolate Protein Bars with a dense chocolate base, little crunchy pieces throughout, and a glossy chocolate topping.
They look indulgent enough for a special dessert while being simple enough to prepare whenever a chocolate craving strikes.
❤️ Conclusion
These no-bake chocolate bars are a simple modern twist on the classic chocolate biscuit dessert. With no wheat flour, no added table sugar, no oven, and plenty of chocolate flavor, they’re an easy treat to keep in the refrigerator.