Introduction
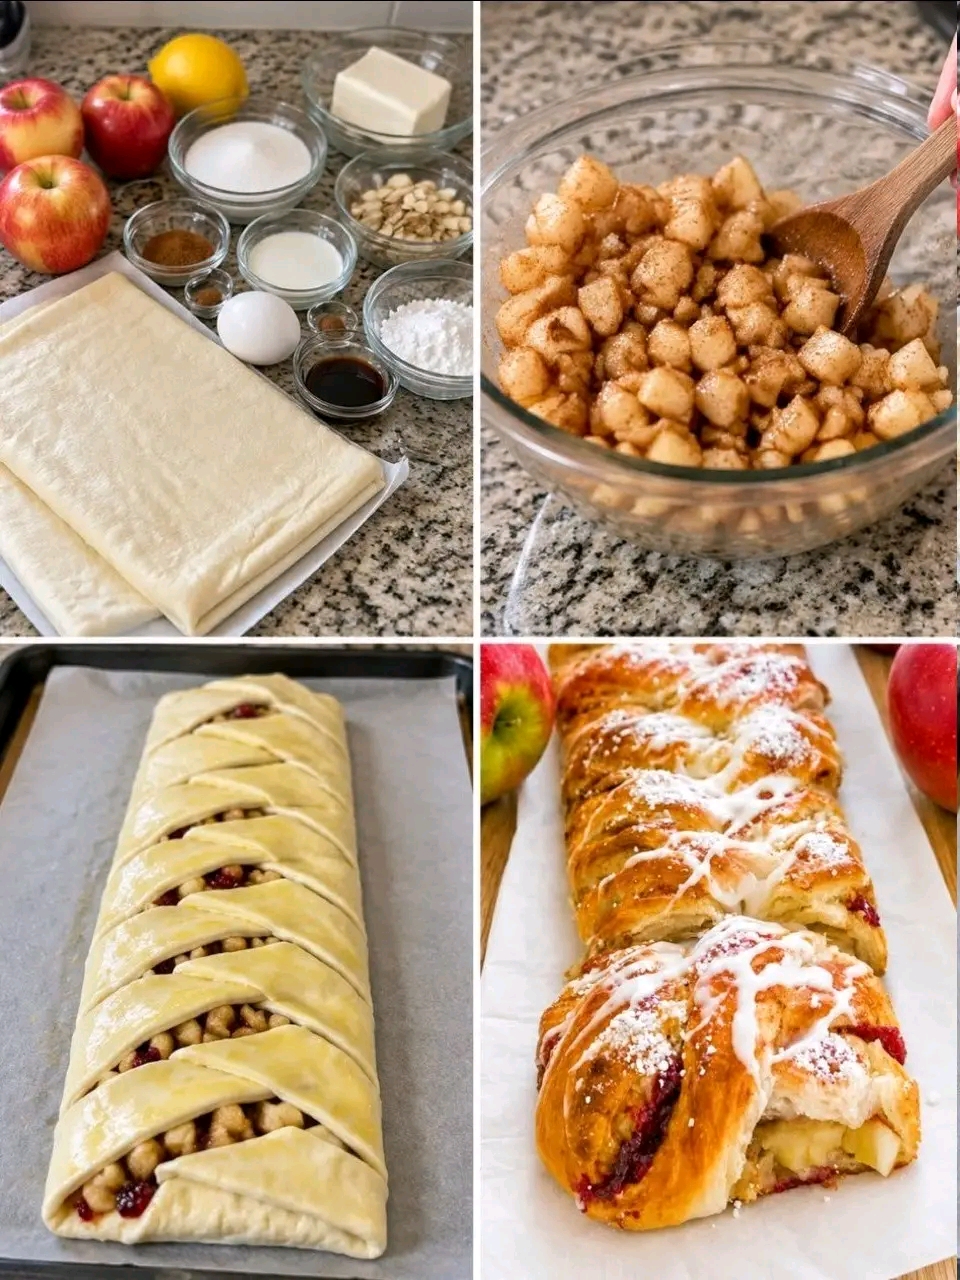
If you love homemade pastries with buttery, flaky layers and a warm, sweet apple filling, this Apple Danish Braid is a recipe you simply have to try! ❤️🥐
Made with golden puff pastry, tender diced apples, warm cinnamon, and a touch of sugar, this beautiful braided pastry looks like something straight from a professional bakery. The outside becomes wonderfully crisp and golden, while the inside is filled with soft, caramelized apples that make every bite irresistible.
The best part? You don’t need to spend hours making pastry dough from scratch. Store-bought puff pastry makes this recipe simple enough for beginners, yet impressive enough to serve at brunch, holiday gatherings, family breakfasts, or afternoon tea.
Serve it warm with a cup of coffee, tea, or cold milk, and watch everyone reach for another slice!
Ingredients
For the Apple Filling
- 2 sheets puff pastry, thawed according to package instructions
- 3 medium apples, peeled, cored, and diced
- 2 tablespoons lemon juice
- 1/3 cup granulated sugar
- 1 teaspoon ground cinnamon
- 1 tablespoon unsalted butter
- 1 tablespoon cornstarch
- 1 tablespoon water
- 1 teaspoon vanilla extract
- A small pinch of salt
For the Pastry
- 1 large egg
- 1 tablespoon milk
- 1 tablespoon coarse sugar, optional
Optional Vanilla Glaze
- 1/2 cup powdered sugar
- 1–2 tablespoons milk
- 1/4 teaspoon vanilla extract
Instructions
Step 1: Prepare the Apples
Peel, core, and dice the apples into small, even pieces. Place them in a bowl and toss with the lemon juice to help preserve their color and add a little brightness.
In a medium saucepan, melt the butter over medium heat. Add the diced apples, granulated sugar, cinnamon, and a pinch of salt.
Cook for approximately 5–8 minutes, stirring occasionally, until the apples begin to soften and release their juices.
Mix the cornstarch with the tablespoon of water in a small bowl. Pour this mixture into the apples and stir well. Continue cooking for another 1–2 minutes until the filling thickens.
Remove the saucepan from the heat and stir in the vanilla extract. Allow the apple filling to cool completely before assembling the pastry.
Step 2: Prepare the Puff Pastry
Preheat your oven to 400°F (200°C). Line a baking sheet with parchment paper.
Lightly flour your work surface and unfold the first sheet of puff pastry. Gently roll it into a rectangle if needed.
Place the pastry on the prepared baking sheet. Imagine dividing the rectangle lengthwise into three equal sections. The middle section will hold the apple filling, while the two outer sections will be cut into strips for braiding.
Repeat with the second pastry sheet if making two separate braids.
Step 3: Add the Apple Filling
Spoon the cooled apple mixture down the center of the pastry, leaving a little space at both ends.
Spread the filling evenly, but avoid adding too much liquid from the saucepan. Excess moisture can make the pastry soggy.
Keep the filling in a neat strip so the braid will be easier to fold and seal.
Step 4: Create the Beautiful Braid
Using a sharp knife, cut diagonal strips approximately 1 inch wide along both sides of the pastry, stopping before reaching the filling.
Fold the top and bottom ends of the pastry over the filling to help seal it. Then fold the side strips over the apple mixture, alternating left and right to create a braided pattern.
Gently press the ends together to keep the filling inside during baking.
Repeat the process with the second sheet of puff pastry.
Step 5: Add the Egg Wash
In a small bowl, whisk together the egg and milk.
Brush the mixture lightly over the top of each braid. This helps the pastry develop a beautiful golden-brown color and a lovely shine.
If desired, sprinkle a little coarse sugar over the top for extra sparkle and crunch.
Step 6: Bake Until Golden
Place the baking sheet in the preheated oven and bake for approximately 20–30 minutes, or until the pastry is puffed, crisp, and deeply golden.
Baking time may vary depending on your oven and the brand of puff pastry you use.
Remove the braids from the oven and allow them to cool on the baking sheet for about 10–15 minutes before slicing.
Step 7: Prepare the Vanilla Glaze
For an extra-special finish, whisk together the powdered sugar, vanilla extract, and enough milk to create a smooth, pourable glaze.
Drizzle the glaze over the slightly cooled pastry. Let it set for a few minutes before serving.
Your homemade Apple Danish Braid is ready to enjoy!
Methods of Preparation
Stovetop method: Cook the apples with butter, sugar, cinnamon, and lemon juice before adding the cornstarch mixture. This step softens the apples and helps prevent excess moisture from making the pastry soggy.
Braiding method: Arrange the filling down the center of the pastry and alternate the diagonal strips from each side. This creates the classic bakery-style braided appearance.
Oven-baking method: Bake at 400°F (200°C) until the pastry is fully puffed and golden. The high initial heat helps the layers rise and become flaky.
Finishing method: Add the vanilla glaze after baking, once the pastry has cooled slightly. This keeps the glaze from melting completely into the warm crust.
A Little History of Danish Pastries
Danish pastries are associated with Denmark and the country’s celebrated baking traditions. Their history is connected to laminated pastry techniques, which create delicate layers of dough and fat that puff up during baking.
The modern Danish pastry tradition developed during the nineteenth century, influenced in part by Austrian baking techniques. Over time, Danish bakers developed their own styles, fillings, shapes, and finishes.
Fruit-filled pastries became popular in bakeries across Europe and North America. Apples, in particular, are a natural choice because their sweetness and gentle tartness pair beautifully with buttery pastry.
The Apple Danish Braid is a home-baking variation inspired by these traditional pastries. Its attractive woven shape makes it especially appealing for breakfast tables, holiday brunches, and homemade gifts.
Benefits of This Apple Danish Braid
Although this is a sweet treat, it can offer a few enjoyable qualities when served as part of a balanced diet.
1. Apples provide fiber
Apples contain dietary fiber, especially when their skins are eaten. This recipe uses peeled apples, so the amount of fiber will be lower than in an unpeeled apple preparation.
2. A source of energy
The carbohydrates in the pastry, apples, and sugar provide energy, making a slice a satisfying breakfast or afternoon snack.
3. Contains useful plant compounds
Apples naturally contain polyphenols and other plant compounds. The amounts retained in the finished pastry depend on the apple variety and cooking method.
4. A comforting homemade treat
Preparing and sharing homemade pastries can make family breakfasts, weekend brunches, and celebrations feel extra special.
5. Easy to customize
You can adjust the spices, choose different apple varieties, reduce the sugar, or add chopped nuts to suit your taste.
A little reminder: This pastry contains butter, sugar, and refined flour, so it is best enjoyed in reasonable portions. It is a delicious dessert, not a weight-loss or medicinal food.
Nutritional Information
Approximate nutrition per serving, assuming 10 servings and depending on the puff pastry brand and glaze:
- Calories: 250–350
- Carbohydrates: 30–45 g
- Fat: 12–20 g
- Protein: 3–5 g
- Sugar: 12–22 g
These figures are estimates only. Check the ingredient labels and calculate the quantities used for a more accurate nutritional breakdown.
Helpful Tips for the Perfect Danish Braid
- Choose firm apples: Granny Smith, Honeycrisp, or Braeburn apples work well because they hold their shape during cooking.
- Cool the filling: Warm filling can soften the puff pastry and make braiding more difficult.
- Avoid overfilling: Too much apple mixture can cause the braid to open during baking.
- Keep the pastry cool: If the dough becomes too soft while working, refrigerate it briefly before baking.
- Use parchment paper: It helps prevent sticking and makes cleanup easier.
- Bake until golden: Pale pastry may not have developed its full crisp texture.
- Glaze after cooling slightly: This gives the pastry a pretty bakery-style finish.
Delicious Variations
Apple Cinnamon Pecan Braid: Add 1/4 cup chopped pecans to the cooled apple filling for extra crunch.
Caramel Apple Danish: Drizzle a little caramel sauce over the apple filling before braiding, or over the finished pastry after baking.
Apple Cream Cheese Braid: Spread a thin layer of sweetened cream cheese down the center before adding the cooled apples.
Apple Cranberry Braid: Add a small handful of dried cranberries for a sweet-tart flavor and festive appearance.
Maple Apple Braid: Replace some of the granulated sugar with maple syrup, reducing other liquid slightly if necessary.
Storage and Reheating
At room temperature: Store the cooled braid in an airtight container for up to 1–2 days, depending on room temperature and humidity.
In the refrigerator: Refrigerate leftovers in an airtight container for up to 4 days.
In the freezer: Freeze completely cooled portions in a freezer-safe container for up to 2 months for best quality.
To reheat: Warm individual slices in an oven at 325°F (165°C) for approximately 5–10 minutes, or until heated through and crisp again. An air fryer can also work well. Avoid prolonged microwave heating because it may soften the flaky layers.
If your pastry contains cream cheese or another perishable filling, refrigerate it promptly.
Serving Suggestions for Apple Danish Lovers
This golden apple braid is delicious served:
- With a hot cup of coffee on a quiet morning.
- Alongside tea for an afternoon treat.
- As part of a weekend brunch with fresh fruit and yogurt.
- Warm with a scoop of vanilla ice cream for dessert.
- On a holiday breakfast table with other homemade pastries.
- With a light drizzle of caramel or vanilla glaze for an extra-special finish.
You can serve it whole on a wooden board for a beautiful presentation or slice it into individual portions before placing it on a serving platter.
Frequently Asked Questions
Can I make the apple filling ahead of time?
Yes! Prepare the filling up to 2 days ahead, refrigerate it in a covered container, and let it cool completely before assembling the braid.
Can I use canned apple pie filling?
Absolutely. Drain any excess liquid and use a moderate amount so the pastry remains crisp. You can add a little cinnamon if desired.
Why did my pastry turn soggy?
The most common reasons are warm filling, excess liquid, or underbaking. Make sure the filling is cool and thick, and bake until the pastry is golden and crisp.
Can I prepare the braid the night before?
For the best texture, prepare the apple filling ahead and assemble the braid shortly before baking. If assembling in advance, cover and refrigerate it, then bake while the pastry is still cold. Allow for a little extra baking time if necessary.
Can I make it without the glaze?
Of course! The braid is delicious on its own, and a light sprinkle of coarse sugar before baking provides a lovely finish.
Conclusion
This Apple Danish Braid combines everything we love about homemade pastries: crisp, buttery layers, tender cinnamon apples, a beautiful braided shape, and a sweet vanilla glaze.
With simple ingredients and an easy preparation method, you can create a bakery-inspired treat right in your own kitchen without making pastry dough from scratch.
Whether you’re preparing a cozy weekend breakfast, treating your family to something special, or looking for a beautiful dessert to share with friends, this recipe is sure to bring warmth and sweetness to your table.
One bite of that flaky crust and soft apple filling, and you’ll understand why fruit-filled pastries remain a favorite across generations. ❤️🍎