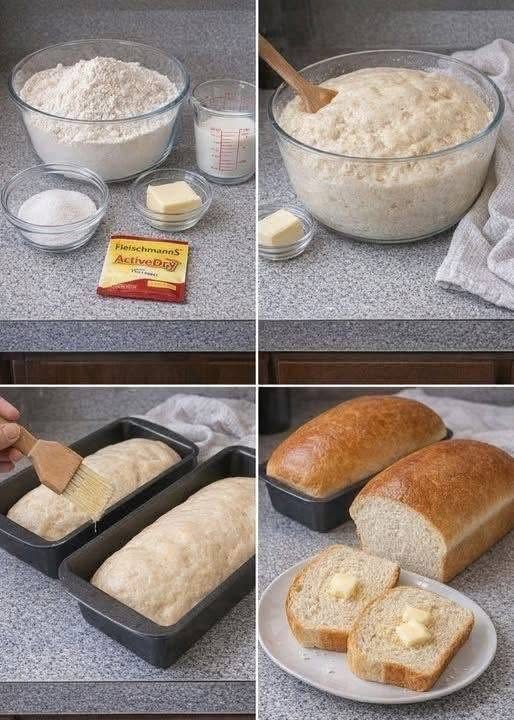
Introduction
You may never want to buy bread from the store again!
There is something incredibly comforting about homemade bread. The moment the dough begins to rise, the kitchen fills with a warm, sweet, yeasty aroma. When the loaf finally comes out of the oven, its golden crust crackles gently as it cools, while the inside remains soft, fluffy, and tender.
This recipe is wonderfully simple and forgiving. You don’t need expensive equipment or complicated bread-making techniques. With a few basic ingredients, some patience, and a little kneading, you can make beautiful homemade bread that is soft enough for sandwiches but delicious enough to eat warm with butter.
And the best part?
Warm, freshly baked bread with butter is absolutely irresistible.
Ingredients
Main ingredients
- 1 cup warm milk
- ½ cup warm water
- 2¼ teaspoons active dry yeast
- ¼ cup granulated sugar
- 2 tablespoons butter, melted
- 1 teaspoon salt
- 4–4½ cups all-purpose flour
For finishing
- 1–2 tablespoons melted butter
- A little extra flour for the work surface
- Optional: sesame seeds, poppy seeds, or oats for topping
Important Ingredient Notes
Warm milk and water
The milk and water should be warm, not hot.
If the liquid is too hot, it can damage the yeast. Think of the temperature as pleasantly warm when touched.
Yeast
Active dry yeast gives the bread its rise and creates the characteristic fresh-baked bread aroma.
Sugar
The sugar adds a slight sweetness and helps create a beautiful golden crust.
Butter
Butter gives the bread richness and softness. Brushing the finished loaf with melted butter makes the crust especially delicious.
Flour
Start with 4 cups and add more only if necessary. Depending on the flour and humidity, you may need up to 4½ cups.
Avoid adding too much flour because an overly dry dough can produce dense bread.
Method 1: Activating the Yeast
Place the warm milk and warm water in a large mixing bowl.
Add the sugar and active dry yeast.
Stir gently and allow the mixture to sit for approximately 5–10 minutes.
The surface should become slightly foamy.
This is a good indication that the yeast is active.
If there is no activity at all after about 10 minutes, the yeast may be old or the liquid may have been too hot or too cold.
Method 2: Making the Dough
Add the melted butter and salt to the yeast mixture.
Begin adding the flour gradually.
Start with about 4 cups.
Stir with a wooden spoon or sturdy spatula until the mixture begins forming a dough.
The dough should be soft and slightly tacky but not extremely sticky.
If necessary, add additional flour one tablespoon at a time.
Don’t rush this stage.
A slightly soft dough usually produces softer bread than a very stiff dough.
Method 3: Kneading
Transfer the dough to a lightly floured work surface.
Knead for approximately 8–10 minutes.
Push the dough forward with the heel of your hand, fold it back toward yourself, turn it slightly, and repeat.
Continue until the dough becomes:
- smooth
- elastic
- soft
- slightly springy
- less sticky
You can also use a stand mixer with a dough hook and knead until the dough becomes smooth and elastic.
The windowpane test
Take a small piece of dough and gently stretch it.
If you can stretch it thin enough that light passes through without the dough immediately tearing, the gluten has developed nicely.
Method 4: First Rise
Lightly grease a large bowl with butter or oil.
Place the dough inside and turn it once so the surface is lightly coated.
Cover the bowl with a clean kitchen towel or plastic wrap.
Place it somewhere warm and allow it to rise for approximately 1–1½ hours, or until it has roughly doubled in size.
The exact time depends on the temperature of your kitchen.
Don’t worry if the dough takes longer on a cool day.
Method 5: Forming the Bread
Once the dough has doubled in size, gently press it down to release excess air.
Transfer it to your work surface.
For one large loaf:
- Shape the dough into a rough rectangle.
- Fold the sides toward the center.
- Roll the dough tightly from one end to the other.
- Pinch the seam closed.
- Place the loaf seam-side down into a greased loaf pan.
For two smaller loaves, divide the dough evenly and shape each piece separately.
You can also form round rustic loaves by shaping the dough into smooth balls and placing them on a parchment-lined baking sheet.
Method 6: Second Rise
Cover the shaped loaf again.
Let it rise for approximately 30–45 minutes.
The dough should become visibly puffy.
Don’t let it rise excessively, because an over-proofed loaf may collapse during baking.
Method 7: Preparing for the Oven
Preheat the oven to 375°F (190°C).
For an attractive finish, gently brush the surface of the risen dough with melted butter.
You can also sprinkle the top with:
- sesame seeds
- poppy seeds
- oats
- a little coarse salt
For a more rustic loaf, make one or two shallow cuts across the top using a very sharp knife.
Method 8: Baking
Place the bread in the preheated oven.
Bake for approximately 25–35 minutes, depending on the shape and size of the loaf.
The bread should become beautifully golden brown.
A properly baked loaf should sound somewhat hollow when gently tapped on the bottom.
If you have a kitchen thermometer, the center should generally be around 190–200°F (88–93°C).
The Butter Finish
This is the part that makes the bread especially tempting.
As soon as the bread comes out of the oven, brush the top generously with melted butter.
The butter melts into the warm crust and gives the loaf a beautiful shine and rich flavor.
Then try to wait a little before slicing.
I know that’s difficult.
But allowing the bread to cool for at least 15–20 minutes helps the crumb finish setting.
History of Homemade Bread
Bread is one of the oldest prepared foods in human history.
Long before modern supermarkets and commercial bakeries, families made bread at home using simple combinations of grains, water, salt, and naturally occurring fermentation.
Over thousands of years, bread-making developed into countless regional traditions.
Different cultures created their own breads using different grains, fermentation methods, shapes, and baking techniques.
The basic idea, however, remains remarkably similar:
flour + liquid + fermentation + heat = bread.
Modern yeast makes the process much more predictable, allowing home bakers to create fluffy loaves without relying entirely on naturally occurring wild yeast.
This recipe follows that same timeless tradition while using convenient modern ingredients.
Benefits of Homemade Bread
Homemade bread has several practical advantages.
Freshness
You control exactly when the bread is baked, so you can enjoy it while it is still fresh and warm.
Ingredient control
You know exactly what goes into your loaf.
There are no mysterious ingredients or unnecessary additions.
Customization
You can change the recipe according to your preferences.
Add herbs, seeds, cheese, garlic, or different grains.
Flavor
Freshly baked bread develops aromas that are difficult to reproduce with packaged bread.
Texture
You can make the crust as light or golden as you prefer while keeping the interior soft and fluffy.
Family tradition
Bread-making can also become a wonderful family activity.
Children can help mix, knead, shape, and decorate the dough.
Formation and Shaping Ideas
Classic sandwich loaf
Shape the dough into a tight cylinder and place it into a loaf pan.
This creates evenly sliced bread that is excellent for sandwiches.
Rustic round loaf
Shape the dough into a tight ball.
Place it on a baking sheet and bake until golden.
This produces a more traditional homemade appearance.
Dinner rolls
Divide the dough into 10–12 equal pieces.
Shape each piece into a smooth ball.
Arrange them close together in a greased baking dish and allow them to rise before baking.
Garlic butter bread
Mix melted butter with minced garlic and a little parsley.
Brush it over the freshly baked bread.
Herb bread
Add dried oregano, rosemary, thyme, or Italian herbs to the dough.
Seeded bread
Sprinkle sesame seeds, sunflower seeds, pumpkin seeds, or poppy seeds over the top before baking.
Troubleshooting
My dough is too sticky.
Add flour gradually, one tablespoon at a time.
Don’t immediately add a large amount of flour.
My dough is too dry.
Add a teaspoon of warm water or milk at a time until the dough becomes soft.
My bread didn’t rise.
Possible causes include inactive yeast, liquid that was too hot, a very cold environment, or insufficient rising time.
My bread is dense.
Too much flour, insufficient kneading, inactive yeast, or inadequate rising can all contribute to dense bread.
My crust is getting too dark.
Cover the loaf loosely with aluminum foil during the final part of baking.
My bread is dry.
Try using slightly less flour and avoid overbaking.
How to Make It Extra Soft
For especially soft bread, remember these secrets:
- Don’t use more flour than necessary.
- Knead until the dough becomes elastic.
- Give the dough enough time to rise.
- Don’t overbake it.
- Brush the hot loaf with butter.
- Allow the bread to cool before slicing.
Serving Suggestions
Fresh homemade bread can be served in countless ways.
Classic
Slice it while still slightly warm and spread generously with butter.
Breakfast
Serve with:
- butter
- honey
- jam
- peanut butter
- cheese
- eggs
Lunch
Use the bread for:
- sandwiches
- grilled cheese
- toast
- chicken sandwiches
- vegetable sandwiches
Dinner
Serve warm alongside:
- soup
- stew
- roasted vegetables
- pasta
- salads
For Bread Lovers
If you love bakery bread, this recipe is an excellent place to start.
The smell of yeast, butter, and freshly baked dough filling the kitchen is part of the experience.
For true bread lovers, the best moment may be when the loaf is still warm and you cut the first slice.
The crust crackles.
The inside is soft.
The butter melts immediately.
And suddenly a simple loaf of bread becomes something special.
Storage
Allow the bread to cool completely before storing it.
Keep it in an airtight container or bread bag at room temperature.
For the best texture, enjoy it within a few days.
You can also slice the loaf and freeze the slices individually. Then simply thaw or toast them whenever you want fresh-tasting bread.
A Few Final Secrets
The recipe is simple, but these small details make a big difference:
Don’t kill the yeast. Keep the liquid warm rather than hot.
Don’t drown the dough in flour. A soft dough produces softer bread.
Don’t rush the rise. Yeast needs time to work.
Don’t overbake. Golden brown is wonderful; very dark and dry is not.
Don’t skip the butter. Brushing the hot bread with melted butter gives it an irresistible finish.
Conclusion
Homemade bread doesn’t have to be complicated.
With just warm milk, warm water, yeast, sugar, butter, salt, and flour, you can create a loaf that is soft, fragrant, golden, and incredibly satisfying.
The real magic happens when you pull the bread from the oven and brush it with butter. The crust shines, the aroma fills the kitchen, and every slice feels like something made with care.
Once you experience that first warm piece of homemade bread, you may understand why so many people fall in love with baking.