Introduction
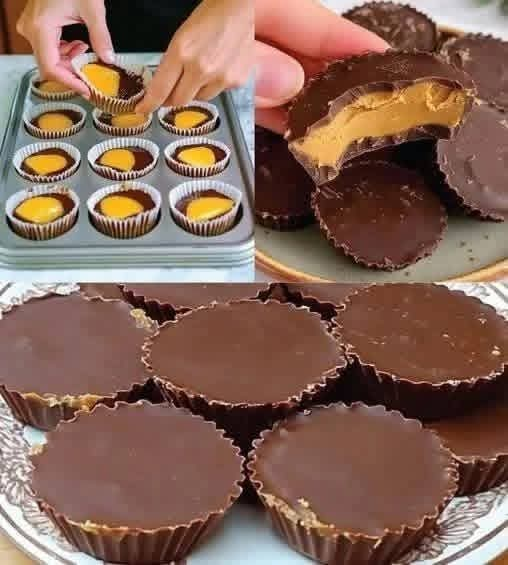
If you love the combination of rich chocolate and creamy peanut butter, these Low-Carb Peanut Butter Cups are the perfect homemade treat! They are easy to prepare, require only a few simple ingredients, and are ideal for beginners who want to make a delicious dessert without spending hours in the kitchen.
These homemade peanut butter cups feature a smooth chocolate coating, a rich and creamy peanut butter center, and just the right balance of sweetness. Unlike traditional peanut butter cups, this version uses low-carb sweeteners and sugar-free chocolate to help reduce the carbohydrate content while preserving the classic flavor everyone loves.
Whether you are following a low-carb lifestyle, looking for a keto-friendly dessert, or simply craving something sweet after dinner, this recipe is a wonderful option. You can prepare a batch ahead of time, keep them refrigerated, and enjoy a little chocolate treat whenever the craving strikes.
The best part? You do not need an oven, special baking equipment, or professional cooking skills. With a muffin pan, paper liners, and a few minutes of preparation, you can create beautiful homemade peanut butter cups right in your own kitchen.
Recipe Information
- Recipe Name: Low-Carb Peanut Butter Cups
- Preparation Time: 15 minutes
- Chilling Time: 45–60 minutes
- Total Time: Approximately 1 hour
- Servings: 12 peanut butter cups
- Difficulty: Easy
- Cooking Method: No-bake
- Course: Dessert, snack, or sweet treat
- Dietary Style: Low-carb; can be keto-friendly depending on the ingredients
- Best For: Chocolate lovers, peanut butter fans, and beginner home cooks
Ingredients
For the Chocolate Coating
- 1 cup (170–180 g) sugar-free dark chocolate chips
- 1 tablespoon coconut oil
- 1 teaspoon vanilla extract, optional
For the Peanut Butter Filling
- 1/2 cup (125 g) natural creamy peanut butter, unsweetened
- 2 tablespoons powdered erythritol or another powdered low-carb sweetener, adjusted to taste
- 2 tablespoons almond flour, optional, for a thicker filling
- 1/2 teaspoon vanilla extract
- A small pinch of salt, if needed
Optional Toppings
- A small pinch of flaky sea salt
- A few crushed roasted peanuts
- Sugar-free white chocolate drizzle
- A light dusting of unsweetened cocoa powder
Ingredient tip: Choose peanut butter without added sugar and chocolate labeled sugar-free or low-carb. Check the nutrition labels because carbohydrate counts vary between brands, and some sugar-free products contain sweeteners that may affect digestion.
Kitchen Equipment
Before starting, gather the following items:
- A 12-cup mini muffin pan or regular muffin pan
- Paper or silicone muffin liners
- Two microwave-safe bowls
- A spoon or small spatula
- Measuring cups and spoons
- A refrigerator
- A small tray or plate for chilling
Silicone molds are particularly useful because the finished peanut butter cups can be removed easily without breaking.
Instructions
Step 1: Prepare the Muffin Pan
Line a 12-cup mini muffin pan with paper liners. If you prefer larger peanut butter cups, use a regular muffin pan and make fewer, bigger portions.
Make sure the liners are clean and dry before adding the chocolate.
Step 2: Melt the Chocolate
Place the sugar-free chocolate chips and coconut oil in a microwave-safe bowl.
Microwave in 20-second intervals, stirring after each interval until the chocolate becomes smooth and glossy. Avoid overheating, as chocolate can burn or become grainy.
If you do not have a microwave, melt the chocolate in a heatproof bowl set over a saucepan of gently simmering water. Keep the bottom of the bowl above the water.
Add the vanilla extract if desired and stir well.
Step 3: Create the First Chocolate Layer
Spoon a small amount of melted chocolate into each liner, enough to cover the bottom completely.
Use the back of a spoon to spread the chocolate evenly toward the edges. This layer forms the base of each peanut butter cup.
Place the pan in the refrigerator for approximately 10–15 minutes, or until the chocolate is firm enough to support the filling.
Step 4: Prepare the Peanut Butter Filling
In a separate bowl, combine the creamy peanut butter, powdered low-carb sweetener, vanilla extract, and optional almond flour.
Stir until the mixture becomes smooth, creamy, and easy to handle.
If the filling seems too soft, add a little more almond flour. If it is too thick, add a small amount of peanut butter.
Taste the filling and adjust the sweetness according to your preference.
Step 5: Add the Peanut Butter Center
Remove the chilled chocolate bases from the refrigerator.
Place a small spoonful of peanut butter filling into the center of each cup. Gently flatten the filling with the back of a spoon, leaving a little space around the edges.
Try not to spread the filling all the way to the sides. Leaving a narrow chocolate border helps the top and bottom layers seal together.
Step 6: Add the Final Chocolate Layer
Spoon the remaining melted chocolate over each peanut butter center.
Spread it gently until the filling is completely covered. Make sure the chocolate reaches the edges so that the cups hold together once chilled.
If the chocolate has become too thick, warm it briefly in the microwave and stir until smooth again.
Step 7: Add Optional Toppings
Before the top chocolate layer sets, sprinkle each cup with a little flaky sea salt or crushed peanuts.
A small amount of sea salt creates a delicious contrast with the rich chocolate and creamy filling.
Step 8: Chill Until Firm
Place the muffin pan in the refrigerator for 30–45 minutes, or until the chocolate is completely set.
For a firmer texture, you can place the cups in the freezer for approximately 15–20 minutes.
Step 9: Serve and Enjoy
Once firm, carefully remove the peanut butter cups from their liners.
Serve them chilled for the best texture. The chocolate should have a satisfying snap, while the peanut butter center remains smooth and creamy.
Enjoy one after dinner, with coffee, or whenever you want a homemade chocolate treat.
Preparation Methods
Method 1: The Classic Refrigerator Method
This is the easiest method for beginners. Melt the chocolate, prepare the filling, layer the ingredients in muffin liners, and chill until firm.
It requires no baking and keeps the kitchen cool, making it especially convenient during warmer weather.
Method 2: The Freezer Method
If you need the cups to set quickly, place them in the freezer after assembling them.
Freeze for approximately 15–20 minutes, checking that the chocolate has hardened before removing the cups.
Avoid leaving them uncovered in the freezer for long periods, as they may develop ice crystals or absorb unwanted odors.
Method 3: The Extra-Creamy Method
For a softer, creamier filling, omit the almond flour and use smooth natural peanut butter.
If your peanut butter is very runny, stir it thoroughly before measuring. The finished cups may need a little longer in the refrigerator to become firm.
Method 4: The Crunchy Peanut Butter Method
If you enjoy texture, use crunchy peanut butter or stir a tablespoon of finely chopped roasted peanuts into the filling.
The small peanut pieces add a pleasant crunch that contrasts with the smooth chocolate coating.
The History of Peanut Butter Cups
Chocolate and peanut butter have become one of the most recognizable flavor combinations in American desserts.
Peanut butter cups gained widespread popularity in the United States during the twentieth century, particularly through commercially produced chocolate candies. Their appeal comes from the contrast between sweet chocolate and the savory, roasted flavor of peanuts.
Over time, home cooks began experimenting with homemade versions, creating treats with different chocolate coatings, fillings, and levels of sweetness.
As low-carb and ketogenic eating styles became more popular, sugar-free chocolate and alternative sweeteners made it possible to create versions with fewer carbohydrates than traditional candy.
Today’s homemade low-carb peanut butter cups offer a simple way to enjoy this familiar combination while adjusting the ingredients to suit individual tastes and dietary preferences.
Benefits of Low-Carb Peanut Butter Cups
These treats can be enjoyable as part of a balanced eating pattern, especially when prepared with carefully selected ingredients.
1. Lower-Carbohydrate Alternative
Using sugar-free chocolate and unsweetened peanut butter can reduce the carbohydrate content compared with conventional peanut butter cups.
However, the actual amount depends on the specific products and sweeteners used. Sugar-free does not automatically mean carbohydrate-free.
2. Provides Some Protein
Peanut butter contains plant-based protein, which contributes to the nutritional value of the filling.
The amount per serving will vary according to the recipe size and ingredients.
3. Contains Unsaturated Fats
Peanuts provide predominantly unsaturated fats. These fats can be part of a heart-conscious eating pattern when they replace some saturated fats.
Coconut oil and chocolate also contribute fat, so portion size remains important.
4. Satisfies Chocolate Cravings
A small homemade dessert can help you enjoy chocolate and peanut butter without needing to prepare a large cake or an elaborate dessert.
Making individual portions also makes it easier to decide how much you want to eat.
5. Convenient for Meal Planning
These cups can be prepared ahead of time and stored in the refrigerator or freezer.
Having individual portions ready can make it easier to plan snacks and desserts throughout the week.
6. Easy to Customize
You can adjust the sweetness, chocolate intensity, and filling texture to suit your preferences.
You can also experiment with different low-carb sweeteners, provided they work well with the recipe.
A nutritional reminder: These peanut butter cups are still an energy-dense dessert. They are not automatically healthier simply because they contain fewer carbohydrates. People managing diabetes or following a therapeutic diet should consider the complete nutrition label and their individual dietary needs.
Nutritional Information
The following is an approximate estimate for one cup when the recipe makes 12 portions.
- Calories: 110–150
- Total fat: 9–13 g
- Protein: 2–4 g
- Total carbohydrates: Approximately 4–8 g
- Fiber: Approximately 1–2 g
- Net carbohydrates: Approximately 2–6 g
These figures are illustrative estimates, not laboratory-tested values. The actual nutrition information may differ substantially depending on the chocolate, peanut butter, sweetener, portion size, and optional ingredients.
To calculate net carbohydrates, subtract fiber and any qualifying sugar alcohols according to the product’s nutrition information. Not all sugar alcohols affect everyone in the same way, and labeling rules vary by country.
Helpful Tips for Perfect Peanut Butter Cups
Choose Good-Quality Chocolate
The chocolate determines much of the final flavor. A good sugar-free dark chocolate provides a rich taste that balances the peanut butter.
Use Powdered Sweetener
Powdered sweetener generally blends more smoothly into the filling than large granules, helping prevent a gritty texture.
Keep the Layers Even
Use similar amounts of chocolate in each liner. A consistent bottom layer and top layer make the cups look attractive and help them hold together.
Avoid Excess Oil in the Filling
Natural peanut butter can separate, so stir it thoroughly before use. Too much oil may make the filling soft and cause the layers to slide.
Do Not Rush the Chilling Process
Let each layer firm up before adding the next. This prevents the chocolate and filling from mixing together.
Taste Before Assembling
Sugar-free chocolate and alternative sweeteners can vary in flavor. Adjust the filling before placing it in the cups.
Make Smaller Portions
Mini cups are a great option when you want a little treat. They are also convenient for serving at parties and sharing with friends.
Delicious Variations
Dark Chocolate Peanut Butter Cups
Use a high-cocoa sugar-free dark chocolate for a deeper, less-sweet flavor.
Almond Butter Cups
Replace peanut butter with unsweetened almond butter for a different nutty flavor. The nutritional values will change.
Coconut Peanut Butter Cups
Add a small amount of unsweetened shredded coconut to the filling for extra texture.
Salted Peanut Butter Cups
Finish each cup with a few flakes of sea salt. The salty-sweet combination is especially delicious with dark chocolate.
Espresso Chocolate Cups
Stir a small pinch of instant espresso powder into the melted chocolate for a subtle coffee flavor.
Extra-Crunchy Cups
Add chopped roasted peanuts to the filling for a more textured center.
Double-Chocolate Cups
Mix a small amount of unsweetened cocoa powder into the peanut butter filling for a stronger chocolate flavor.
Serving Suggestions
Low-Carb Peanut Butter Cups can be served in many simple and delicious ways.
- Enjoy one with a cup of unsweetened coffee or tea.
- Serve them as a small dessert after lunch or dinner.
- Arrange them on a dessert platter for family gatherings.
- Cut them into smaller pieces and serve alongside fresh strawberries.
- Add one to a homemade low-carb dessert box.
- Serve them chilled with a small bowl of fresh berries.
For a beautiful presentation, arrange the cups on a white plate and finish with a light sprinkle of sea salt.
Storage Instructions
Refrigerator Storage
Place the finished cups in an airtight container and store them in the refrigerator for approximately 1–2 weeks, provided the ingredients are fresh and handled properly.
Keep them chilled because the peanut butter filling may soften at room temperature.
Freezer Storage
Arrange the cups in a freezer-safe container, separating layers with parchment paper.
Freeze for approximately 2–3 months for best quality.
Allow a frozen cup to soften in the refrigerator or at room temperature for a few minutes before eating.
Can You Make Them Ahead?
Absolutely! These cups are ideal for preparing ahead of time. Make a batch on the weekend and keep them refrigerated for convenient portions throughout the week.
Common Mistakes to Avoid
Mistake 1: Overheating the chocolate. Heat in short intervals and stir frequently.
Mistake 2: Using filling that is too runny. Choose thicker peanut butter or add a little almond flour.
Mistake 3: Adding too much filling. Leave enough space for the chocolate coating to cover the center completely.
Mistake 4: Removing the cups too early. Allow enough chilling time for the chocolate to become firm.
Mistake 5: Assuming all sugar-free products are low-carb. Read labels carefully because some products contain starches or other carbohydrates.
Mistake 6: Forgetting allergies. Peanut butter is a common allergen. Avoid serving these cups to anyone with a peanut allergy, and prevent cross-contact with other foods.
Frequently Asked Questions
Are these peanut butter cups keto-friendly?
They can fit into some ketogenic meal plans when made with suitable low-carb ingredients and eaten in appropriate portions. Check the net carbohydrate content of your specific ingredients.
Do I need to bake them?
No. This is a no-bake recipe that sets in the refrigerator or freezer.
Can I use regular peanut butter?
Yes, but choose a variety without added sugar if you want to keep the carbohydrate content lower.
Can I use milk chocolate?
Yes. Sugar-free milk chocolate can be used, although its sweetness and nutritional values may differ from dark chocolate.
What if I do not have coconut oil?
You can melt the chocolate without it, although coconut oil helps make the chocolate smoother and easier to spread.
Why are my peanut butter cups too soft?
They may need more chilling time, or the peanut butter filling may contain too much oil. Keep them refrigerated and adjust the filling consistency next time.
Can I make them dairy-free?
Yes. Choose dairy-free sugar-free chocolate and verify that all other ingredients meet your dietary requirements.
Can I make them without almond flour?
Yes. Almond flour is optional. Leave it out for a softer filling or use a suitable alternative if you have a nut allergy, keeping in mind that peanut butter itself is also a nut-family allergen for food-labeling purposes in some jurisdictions and remains a major allergen.
Why Peanut Butter Lovers Will Love This Recipe
These homemade peanut butter cups bring together everything people love about a classic chocolate treat: a rich chocolate shell, a smooth peanut butter center, and a satisfying balance of sweet and salty flavors.
They are simple enough for beginners, easy to prepare in batches, and versatile enough to customize with different toppings and fillings.
Unlike complicated desserts that require mixing, baking, cooling, and decorating, this recipe keeps the process straightforward. A few basic ingredients and a little patience are all you need.
Whether you enjoy dark chocolate, creamy peanut butter, or a crunchy center, you can adapt the recipe to create your favorite version.
Conclusion
Low-Carb Peanut Butter Cups are a delicious homemade dessert for anyone who loves chocolate and peanut butter. With a handful of ingredients, no oven, and only a little preparation, you can create a batch of creamy, satisfying treats right at home.
The combination of smooth peanut butter, rich chocolate, and optional sea salt makes every bite enjoyable. Best of all, the recipe is flexible: you can adjust the sweetness, choose your favorite sugar-free chocolate, and make the cups as small or as large as you prefer.
Prepare them for your family, share them with friends, or keep a few in the refrigerator for whenever you want a sweet treat.
If you love easy, beginner-friendly recipes, these Low-Carb Peanut Butter Cups deserve a place in your homemade dessert collection.
Give this recipe a try, and enjoy every chocolatey, peanut-buttery bite!