Introduction
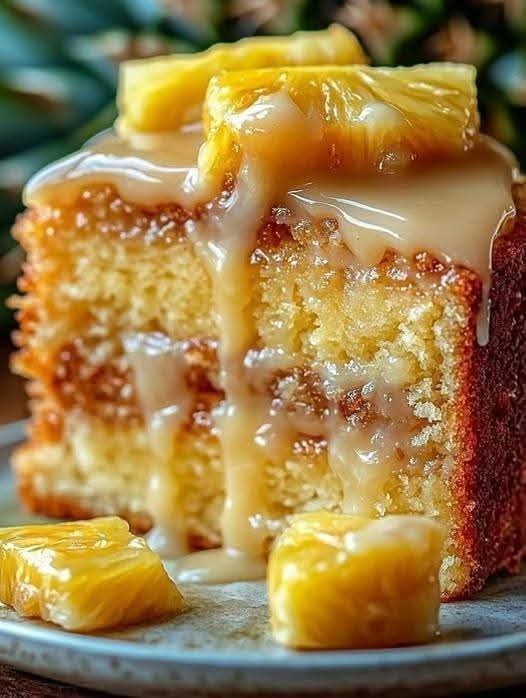
If you love soft, buttery cakes with a refreshing tropical flavor, this Pineapple Heaven Cake is the perfect dessert for you! 🍍✨ Every bite is filled with the sweetness of pineapple, the richness of butter, and the delicate flavor of vanilla. The sour cream helps create a tender, moist texture, while the simple pineapple glaze adds a beautiful finishing touch.
This homemade cake is easy to prepare with everyday ingredients and is perfect for family gatherings, birthday celebrations, afternoon coffee, weekend baking, or simply satisfying your sweet tooth.
The best part? You don’t need complicated baking techniques or expensive ingredients to make this delicious dessert. Mix, bake, glaze, and enjoy a little taste of paradise right in your kitchen!
Save this recipe and share it with someone who loves pineapple desserts! ❤️
Ingredients
For the Cake
- 1½ cups all-purpose flour
- 1 teaspoon baking powder
- ½ teaspoon salt
- ½ cup unsalted butter, softened
- 1 cup granulated sugar
- 2 large eggs, room temperature
- 1 teaspoon vanilla extract
- ½ cup sour cream
- 1 cup crushed pineapple, well drained
For the Pineapple Glaze
- ½ cup powdered sugar
- 2 tablespoons pineapple juice
Optional Decorations
- A few small pineapple pieces
- A light dusting of powdered sugar
- Shredded coconut
- Fresh mint leaves
Instructions
Step 1: Prepare Your Oven
Preheat your oven to 350°F (175°C). Grease an 8-inch round cake pan or a similar-sized baking pan with butter or nonstick cooking spray. You can also line the bottom with parchment paper to make removing the cake easier.
Step 2: Mix the Dry Ingredients
In a medium bowl, whisk together the flour, baking powder, and salt. Mixing these ingredients first helps distribute the baking powder evenly throughout the cake.
Set the bowl aside while you prepare the wet ingredients.
Step 3: Cream the Butter and Sugar
In a large mixing bowl, beat the softened butter and granulated sugar together for about 3–4 minutes, until the mixture becomes pale, light, and fluffy.
This step helps incorporate air into the batter, giving your cake a lighter texture.
Step 4: Add the Eggs and Vanilla
Add the eggs one at a time, beating well after each addition. Stir in the vanilla extract until everything is smooth and well combined.
If the mixture looks slightly curdled, don’t worry. Adding the dry ingredients gradually should help bring the batter together.
Step 5: Add the Sour Cream
Mix in the sour cream until fully incorporated. It adds moisture and a gentle tang that balances the sweetness of the cake.
Step 6: Combine the Dry and Wet Ingredients
Gradually add the flour mixture to the wet ingredients. Mix on low speed or fold gently with a spatula until just combined.
Avoid overmixing, as this can make the cake dense instead of soft and tender.
Step 7: Fold in the Pineapple
Make sure the crushed pineapple is well drained. Gently fold it into the batter until evenly distributed.
The pineapple brings natural sweetness, fruity flavor, and little bursts of tropical goodness to every slice.
Step 8: Bake the Cake
Pour the batter into the prepared pan and smooth the top with a spatula.
Bake for approximately 30–40 minutes, or until the top is golden and a toothpick inserted into the center comes out clean or with a few moist crumbs.
If the center is still wet, continue baking for a few more minutes and check again.
Step 9: Cool the Cake
Remove the cake from the oven and let it rest in the pan for about 10–15 minutes. Carefully transfer it to a wire rack and allow it to cool completely before adding the glaze.
Cooling helps the cake set and prevents the glaze from melting straight off the surface.
Step 10: Prepare the Pineapple Glaze
In a small bowl, whisk together the powdered sugar and pineapple juice until smooth.
For a thicker glaze, add a little more powdered sugar. For a thinner glaze, add a few extra drops of pineapple juice.
Step 11: Glaze and Decorate
Drizzle the glaze over the completely cooled cake, allowing it to run gently down the sides.
For a beautiful presentation, sprinkle a little shredded coconut over the top or decorate with a few small pineapple pieces.
Step 12: Slice and Enjoy!
Allow the glaze to set for several minutes before slicing. Serve with coffee, tea, or a scoop of vanilla ice cream for an extra-special dessert experience.
Methods of Preparation
Creaming method: The butter and sugar are beaten together first to create a light base for the cake.
Folding method: The flour mixture and crushed pineapple are incorporated gently to avoid overmixing and preserve a tender texture.
Baking method: The cake is baked at a moderate temperature until golden and fully cooked in the center.
Glazing method: A simple mixture of powdered sugar and pineapple juice adds a sweet, fruity finish after the cake has cooled.
These methods work together to produce a soft, flavorful cake with a delicate crumb and a refreshing pineapple taste.
A Little History of Pineapple Cake
Pineapple desserts have a long and delicious history. Pineapples originated in South America and eventually became popular around the world as trade expanded and preservation methods improved.
During the nineteenth and twentieth centuries, pineapple became a beloved ingredient in cakes, puddings, and other sweet treats. Canned pineapple made it easier for home bakers to enjoy its tropical flavor throughout the year.
Pineapple upside-down cake became particularly famous in American home baking, while countless other pineapple cake recipes developed their own unique styles.
Pineapple Heaven Cake is inspired by this tradition of combining fruit with simple, comforting cake ingredients. Its buttery texture, sweet pineapple flavor, and delicate glaze make it a wonderful modern addition to any dessert table.
Benefits of the Ingredients
🍍 Pineapple
Pineapple contains vitamin C, water, and other nutrients. It also contributes a naturally sweet, tangy flavor that makes desserts taste fresh and fruity.
🧈 Butter
Butter contributes richness, flavor, and a tender texture to baked goods.
🥚 Eggs
Eggs provide protein and help bind the ingredients together while supporting the cake’s structure.
🥛 Sour Cream
Sour cream adds moisture and a mild tang, helping create a soft, tender crumb.
🌾 All-Purpose Flour
Flour provides the structure that allows the cake to rise and hold its shape.
🍦 Vanilla Extract
Vanilla enhances the aroma and complements the sweet, tropical pineapple flavor.
A helpful note: This is a dessert, so it is best enjoyed in reasonable portions as part of a balanced diet. The cake also contains added sugar, butter, and refined flour.
Preparation and Baking Information
- Preparation time: 15 minutes
- Baking time: 30–40 minutes
- Cooling and glazing time: 30–45 minutes
- Total time: Approximately 1 hour 15 minutes to 1 hour 40 minutes
- Servings: 8–10 slices
- Oven temperature: 350°F (175°C)
- Difficulty: Easy
- Best for: Family desserts, celebrations, afternoon tea, and weekend treats
Times may vary depending on your oven and the baking pan you use.
Tips for the Perfect Pineapple Heaven Cake
- Drain the pineapple well. Too much liquid can make the center soggy.
- Use room-temperature ingredients. Softened butter, eggs, and sour cream mix more evenly.
- Do not overmix. Stop mixing as soon as the flour disappears into the batter.
- Check for doneness. Insert a toothpick into the center and make sure it comes out without wet batter.
- Cool before glazing. This helps the glaze stay on the cake instead of disappearing into the warm surface.
- Customize the flavor. Add a little lemon zest or shredded coconut for a tropical twist.
- Store properly. Keep the cake covered in the refrigerator because of its moisture-rich ingredients. Enjoy within approximately 3–4 days for the best quality.
Delicious Variations
Coconut Pineapple Heaven Cake
Fold ¼ cup of shredded coconut into the batter for an extra tropical flavor.
Pineapple Lemon Cake
Add 1 teaspoon of finely grated lemon zest to brighten the pineapple flavor.
Cream Cheese Topping
Replace the simple glaze with a thin layer of cream cheese frosting for a richer dessert.
Pineapple Upside-Down Style
Arrange pineapple rings and a little brown sugar in the bottom of a suitable pan before adding the batter. The baking method and timing may need adjustment for this variation.
Extra Fruity Version
Serve each slice with fresh pineapple pieces or a spoonful of lightly sweetened whipped cream.
Serving Suggestions
Pineapple Heaven Cake tastes wonderful when served slightly chilled or at room temperature. Pair it with a cup of coffee, black tea, or a refreshing glass of iced tea.
For parties and family dinners, arrange the slices on a beautiful serving platter and decorate with pineapple pieces and a little coconut.
For a more indulgent dessert, serve a warm slice with vanilla ice cream. The combination of buttery cake, fruity pineapple, and cold creamy ice cream is absolutely delightful!
Frequently Asked Questions
Can I use fresh pineapple?
Yes! Finely chop fresh pineapple and drain away excess juice before adding it to the batter.
Can I make the cake ahead of time?
Absolutely. Bake the cake a day ahead, allow it to cool, and store it covered in the refrigerator. Add the glaze shortly before serving for the freshest appearance.
Can I freeze Pineapple Heaven Cake?
Yes. Freeze the completely cooled, unglazed cake in an airtight, freezer-safe container for up to about 2 months for best quality. Thaw in the refrigerator and add the glaze before serving.
Why is my cake too moist in the center?
The pineapple may not have been drained enough, or the cake may need additional baking time. Check the center with a toothpick and continue baking if necessary.
Can I make cupcakes with this batter?
Yes. Divide the batter among lined cupcake wells, filling each about two-thirds full. Begin checking for doneness after approximately 18–25 minutes.
Conclusion
Pineapple Heaven Cake is a simple yet irresistible homemade dessert that brings sunshine to every slice! With its soft buttery crumb, juicy pineapple pieces, delicate vanilla aroma, and sweet pineapple glaze, it is the perfect treat for anyone who loves fruity cakes.
Whether you’re baking for your family, preparing something special for guests, or simply craving a delicious homemade dessert, this recipe is worth saving.
One bite is all it takes to fall in love with the tropical flavor and comforting homemade goodness!
Save this recipe, share it with your friends, and make it for your next family gathering. 🍍💛