Introduction
Crispy Garlic Sticks are a delicious savory snack made from a simple flour-based dough flavored with fresh garlic, celery, margarine, eggs, salt, chicken stock powder, and black pepper. The dough is rolled very thin, cut into long strips, and deep-fried until beautifully golden, crunchy, and aromatic.
These garlic sticks are perfect for serving as a snack, appetizer, party food, or homemade treat. Their crisp texture and strong garlic flavor make them especially enjoyable for people who love savory and crunchy foods. They can also be prepared in large quantities and stored in an airtight container for later enjoyment.
History and Background
Garlic has been used in cooking for thousands of years and is an important ingredient in many cuisines around the world. It is valued for its strong aroma, distinctive flavor, and ability to add depth to savory dishes.
Flour-based fried snacks have also been prepared in many different cultures. Although the exact origin of this particular garlic-stick recipe may vary from family to family and region to region, the basic idea is simple: combine flour with flavorful ingredients, form a thin dough, cut it into pieces, and fry it until crisp.
This recipe combines these traditional ideas with garlic and celery to create a flavorful homemade snack. The addition of tapioca flour helps contribute to a light and crunchy texture, while eggs and margarine enrich the dough.
Ingredients
Main Ingredients
- 1 kg all-purpose flour
- 100 g tapioca flour
- 100 g margarine
- 2 eggs
- 8 cloves garlic, finely minced or crushed
- 2 stalks celery, finely chopped
- 2 teaspoons salt
- 1 teaspoon chicken stock powder
- ½ teaspoon ground black pepper
- 400–500 ml water, added gradually as needed
- Oil, as needed for deep frying
Equipment Needed
- Large mixing bowl
- Measuring spoons
- Kitchen scale or measuring cups
- Rolling pin
- Knife or pastry cutter
- Deep frying pan or heavy-bottomed pot
- Slotted spoon
- Large plate or tray
- Paper towels or a draining rack
- Airtight storage container
Preparation
Before beginning, prepare all the ingredients.
- Peel and finely mince or crush the garlic.
- Wash and finely chop the celery.
- Measure the all-purpose flour and tapioca flour.
- Prepare the margarine and eggs.
- Measure the salt, chicken stock powder, and black pepper.
- Have the water ready, but do not add all of it at once.
- Prepare a clean work surface for rolling and cutting the dough.
Proper preparation makes the cooking process easier and helps ensure that the ingredients are evenly distributed throughout the dough.
Method 1: Making the Dough
Place the all-purpose flour and tapioca flour into a large mixing bowl.
Add the salt, chicken stock powder, and ground black pepper. Mix the dry ingredients thoroughly so that the seasonings are evenly distributed.
Next, add the minced garlic, chopped celery, margarine, and eggs. Mix everything together using your hands or a sturdy spoon.
Gradually add the water while kneading the mixture. Start with a smaller amount of water and add more only when necessary.
Continue kneading until a smooth, firm dough forms. The dough should hold together without being excessively wet or sticky.
The exact amount of water may vary because different types of flour absorb water differently.
Method 2: Resting the Dough
Once the dough has been kneaded, cover it with a clean kitchen towel or plastic wrap.
Allow it to rest for approximately 15 minutes.
Resting gives the flour time to absorb the moisture and makes the dough easier to roll. It also helps the dough become more manageable when cutting the strips.
Method 3: Rolling the Dough
Divide the dough into several small portions.
Take one portion and roll it out very thin using a rolling pin.
The thinner the dough, the lighter and crispier the finished garlic sticks are likely to be.
Try to maintain an even thickness throughout the dough so that the pieces cook at approximately the same rate.
Repeat the process with the remaining dough.
Method 4: Cutting the Garlic Sticks
Using a sharp knife or pastry cutter, cut the rolled dough into long, thin strips.
The strips can be made relatively narrow for a delicate, crispy snack or slightly wider for a more substantial texture.
Try to keep the pieces similar in size. Uniform pieces are easier to fry evenly.
Separate the strips gently so they do not stick together.
Method 5: Deep-Frying
Pour enough cooking oil into a deep frying pan or heavy-bottomed pot.
Heat the oil over medium heat.
Before adding a large batch, test one small piece of dough. It should begin frying steadily without immediately becoming dark.
Add the garlic sticks in small batches.
Do not overcrowd the pan because too many pieces can lower the oil temperature and cause the garlic sticks to absorb excessive oil.
Fry until the sticks become golden brown and crisp.
Turn them gently during frying if necessary so that both sides cook evenly.
Once cooked, remove the garlic sticks using a slotted spoon.
Place them on paper towels or a draining rack to remove excess oil.
Repeat until all the dough has been fried.
Method 6: Cooling and Storage
Allow the fried garlic sticks to cool completely before storing them.
This step is important because putting warm food into a sealed container can trap steam and moisture. Moisture can make crispy snacks become soft.
Once completely cool, place the garlic sticks in a clean, dry, airtight container.
Store them at room temperature in a cool, dry place.
When properly fried, cooled, and stored, the garlic sticks can remain pleasantly crisp.
Important Cooking Tips
1. Control the oil temperature
Keep the oil at medium heat. If the oil is excessively hot, the outside may brown quickly while the inside has not cooked properly.
If the oil is too cool, the dough may absorb more oil and become greasy instead of crisp.
2. Roll the dough thinly
Thin dough generally produces a lighter and crunchier garlic stick.
3. Do not overcrowd the pan
Fry in small batches to maintain a more consistent oil temperature.
4. Cool completely
Never seal the garlic sticks while they are still warm.
5. Keep moisture away
Store the finished snack in an airtight container after it has completely cooled.
6. Cut evenly
Similar-sized strips cook more evenly and give the finished snack a more attractive appearance.
Formation of the Garlic Sticks
The formation process is an important part of the recipe.
The dough begins as a mixture of flour, tapioca flour, eggs, margarine, garlic, celery, and seasonings. Water is gradually incorporated until the ingredients form a firm dough.
After resting, the dough is divided into smaller portions. Each portion is rolled into a thin sheet. The sheet is then cut into long strips.
During frying, the water contained in the dough turns into steam. At the same time, the heat cooks and dries the dough, creating the characteristic crisp texture.
The finished garlic sticks become golden brown on the outside and crunchy throughout when properly fried.
Flavor and Texture
Crispy Garlic Sticks have a strong savory flavor with noticeable garlic and celery aromas.
The main characteristics are:
- Texture: Crisp and crunchy
- Flavor: Savory, garlicky, and lightly peppery
- Aroma: Fragrant garlic with fresh celery notes
- Color: Golden brown
- Shape: Long, thin strips
- Finish: Dry and crunchy rather than soft
The tapioca flour contributes to the desired crispness, while the margarine and eggs add richness to the dough.
Benefits
Crispy Garlic Sticks can provide several nutritional benefits depending on the ingredients and portion size.
Garlic
Garlic contains various naturally occurring compounds and is widely used as part of a balanced diet. It also provides flavor, allowing a recipe to have a strong savory character without relying entirely on additional seasonings.
Celery
Celery contributes small amounts of vitamins, minerals, water, and dietary fiber while also providing fresh flavor and aroma.
Eggs
Eggs provide protein and several nutrients. They also help enrich the dough and contribute to its structure.
Flour
All-purpose flour provides carbohydrates, which are an important source of energy.
Tapioca Flour
Tapioca flour is primarily a source of carbohydrate and is useful in this recipe for helping create a crisp texture.
It is important to remember that these are fried snacks, so they are best enjoyed in moderate portions as part of a varied and balanced diet.
Serving Suggestions
Crispy Garlic Sticks can be served in many ways.
They are excellent as:
- A tea-time snack
- A party appetizer
- A crunchy afternoon snack
- A side for soup
- A snack for family gatherings
- A homemade food gift
- A crunchy accompaniment to savory dips
They can also be served alongside chili sauce, tomato-based dipping sauce, mayonnaise-based dips, or other preferred savory sauces.
For Garlic-Stick Lovers
For people who love garlic, the amount of garlic can be adjusted according to personal preference.
If you prefer a stronger garlic flavor, you can experiment with slightly more garlic. If you prefer a milder flavor, reduce the amount.
Freshly crushed garlic generally gives the dough a stronger and more noticeable aroma.
Garlic-stick lovers may also enjoy experimenting with additional seasonings such as a small amount of chili, paprika, or other dried herbs. However, these additions should be introduced carefully so that they do not overpower the garlic and celery flavors.
Production Method Summary
The complete production process can be summarized as follows:
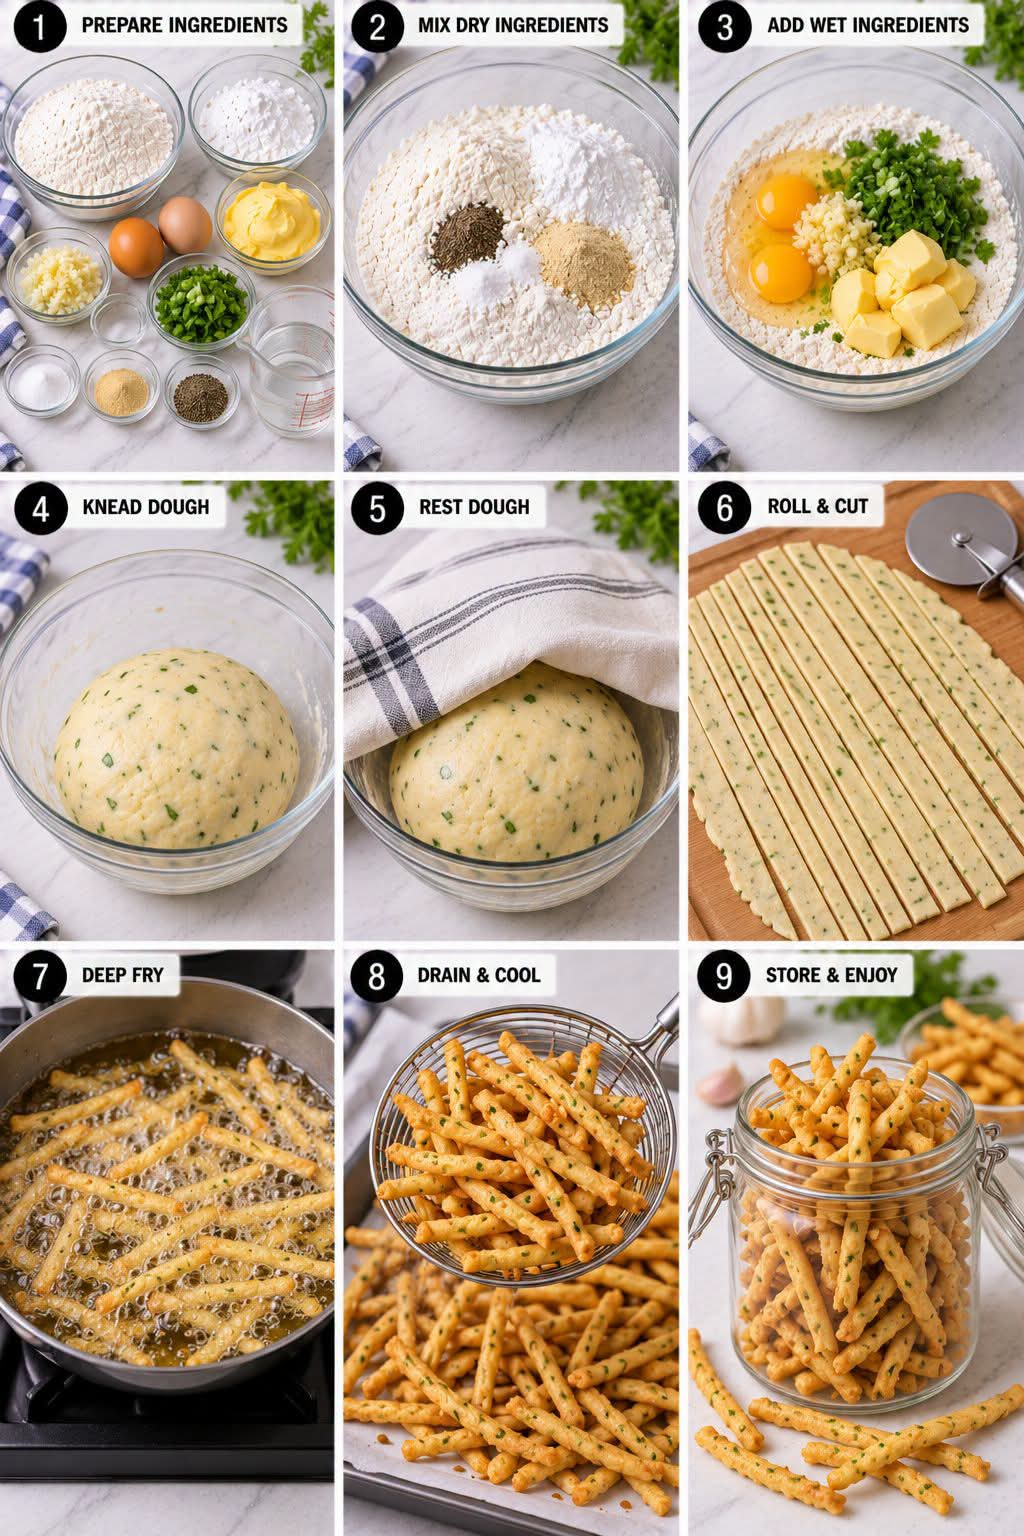
Measure → Mix dry ingredients → Add garlic and other ingredients → Add water → Knead → Rest → Roll → Cut → Fry → Drain → Cool → Store
Each stage contributes to the quality of the final product.
The kneading stage develops the dough, resting makes it easier to handle, rolling determines the thickness, cutting creates the characteristic stick shape, and frying develops the golden color and crunchy texture.
Troubleshooting
If the garlic sticks are too hard
The dough may have been rolled too thick or fried for too long.
If they are too oily
The oil may not have been hot enough, or too many pieces may have been fried at once.
If they brown too quickly
The oil temperature may be too high.
If they become soft after cooling
They may not have been fried sufficiently, or they may have been stored before cooling completely.
If the dough is too sticky
Add a small amount of flour and continue kneading until the dough becomes firm and manageable.
If the dough is too dry
Add water gradually in very small amounts until the dough comes together.
Food Safety and Hygiene
Always wash your hands and use clean equipment when preparing the dough.
Make sure the garlic and celery are fresh and properly cleaned.
When deep-frying, take care around hot oil and keep water away from the frying pan. Never leave hot oil unattended.
Allow the finished garlic sticks to cool before placing them in a storage container.
Conclusion
Crispy Garlic Sticks are a flavorful and satisfying homemade snack that combines the aroma of fresh garlic with the savory taste of celery, black pepper, and chicken stock seasoning.
The recipe is straightforward: prepare a firm dough, allow it to rest, roll it thinly, cut it into strips, and fry the pieces until golden and crisp. Paying attention to dough thickness and oil temperature is particularly important for achieving the desired crunchy texture.
With their attractive golden color, strong garlic aroma, and satisfying crunch, these garlic sticks are suitable for family gatherings, celebrations, snack time, and everyday enjoyment.
Most importantly, making them at home allows you to control the ingredients and adjust the seasoning according to your personal taste. For garlic lovers, they can become a favorite homemade snack that is enjoyable both freshly prepared and stored for later.